I'm thinking of how on earth to organise my fabric collection. At the moment it's currently in giant plastic tubs with lids or in a few washing baskets. Not very helpful for viewing my full range of fabrics, and also not very useful in keeping my limited space tidy! I have some storage drawers from Ikea, but I don't think they're going to be helpful either because (apart from being currently in use) they're just too deep.
I'm currently going with the idea of some wide, but not too deep shelving - and not drawers. I think I'll store the large quantities of fabric into the big plastic tubs. Hmmm. I think this idea needs some more research.
Thursday, 31 January 2008
Tuesday, 29 January 2008
Sunday, 27 January 2008
Tool roll
ere's a tool roll that I made for my friend, Kat, who loves to paint and draw. The instructions for this come from Simple Sewing by Lotta Jansdotter. This was the first project I attempted from this book, and you'll see that I have used this book for the basis of many of my recent projects! There are just so many practical things in it!
It took about 1-1.5 hours to make and was very easy. The backing of the tool roll is an old cushion cover that I found at a car boot sale for 50c. I just love a good bargain! I made a second one and made sure the ties were a bit longer.
I think I should make one for myself...


It took about 1-1.5 hours to make and was very easy. The backing of the tool roll is an old cushion cover that I found at a car boot sale for 50c. I just love a good bargain! I made a second one and made sure the ties were a bit longer.
I think I should make one for myself...


Thursday, 24 January 2008
Introducing... "Taste Sensations!"
Gib and I play this game called 'Taste sensations' whenever we go down to our local asian grocer or whenever we go out somewhere that we can't read the menu. The aim is to broaden our taste buds and have a good laugh (or cry!!! oh my stomach still wretches at the thought of some of our adventures) and we've had so many good times. Most of the taste sensations we've bought just because of the amusing names, and many have been pleasantly surprising. Some of this stuff you may very well have seen before. Here are a few of our choice buys:

Haw flakes:
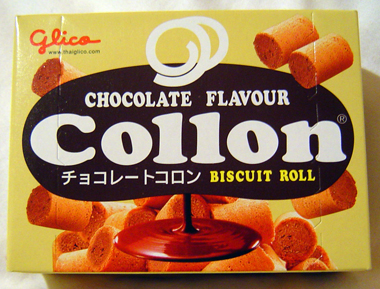
Chocolate filled Collon:
Ohhh hee hee, how juvenile of us! But how can you say no?! They're little wafer biscuity things with a chocolate filling. Well worth buying again.
Daifuku:
We had no idea what these were when we bought them, but haven't stopped buying them since. They're a sweet, Japanese rice cake, with a flavoured filling - usually custard, melon or strawberry flavoured. They're not overly sweet and very filling even after one or two, so you don't feel like eating the whole damn pack. Absolutely delicious - highly recommend!!Calpico:
After discovering this stuff, Gib was drinking it by the slab! It's a fermented soda drink. I can't stand the stuff myself, but clearly Gib has a different opinion. We bought it upon recommendation from a friend, and again, found the name childishly amusing (sounds like "cow p***) so it had to be purchased.
After discovering this stuff, Gib was drinking it by the slab! It's a fermented soda drink. I can't stand the stuff myself, but clearly Gib has a different opinion. We bought it upon recommendation from a friend, and again, found the name childishly amusing (sounds like "cow p***) so it had to be purchased.
.
Haw flakes:
Well, you can guess why we got these ones. And they were so cheap so how could I go wrong! Only 50c for a whole packet! They're a Chinese sweet, made from Chinese Hawthorn. Apparently they have many health benefits. They're little round discs, about the size of an Australian 5c piece. Not such a winner in my books, but our pet rat, Mobius, loves them.

Hot Pot:
We discovered a hot pot house next to Glen Waverley station (it's next to the Lucky Cup bubble tea shop), and this is just the epitome of Taste Sensations. A big pot pot of broth, which you can see in the photo, where you order whatever crazy ingredients you want and cook them up yourself and eat it. Regular greens, like bok choy, spinach etc., but also various balls of all sorts of things, strange looking mushrooms, strange looking tofu, delicious home made noodles and sauces. Messy, but so much fun! Here's a photo from last Sunday when Gib and I went out with some of friends.

Tuesday, 22 January 2008
Coconut creamed rice with raspberries
Here it is: the best dessert ever to exist. I cannot get over how good it tastes! I got it out of a Diabetic Living magazine while sitting in a GP waiting room quite a few months ago (and chances are the edition in the waiting room would have been about 3 years old anyway). I just want to eat the whole pot! I cannot express to you just how delicious this recipe is. It's all about the coconut. Unfortunately I don't have a photo, so you'll just have to use your imagination.
- 400 ml coconut milk
- 500 ml milk
- 1/2 tsp vanilla extract
- 1 cup short grain white rice
- 300 g frozen raspberries
Heat up the coconut milk, milk and vanilla essence until it's gentle boiling. Slowly add the rice, stir frequently. Turn down to the lowest heat setting. Cook until rice is soft, stirring often. Take off heat. Stir through frozen raspberries and leave it for a couple of minutes to allow the raspberries to defrost before serving.
Be gentle with your stirring: If you stir too much, it mooshes up the raspberries and you lose the contrast between the coconut rice and raspberries, and it also doesn't look so visually appealing. You want your creamed rice to stay white, with little pockets of bright pink, juicy raspberries... mmmm...
Monday, 21 January 2008
Mango Chutney
 Summer means mangoes! Apart from eating them fresh and chewing on the giant furry pip for ages, I like to make mango chutney. My dad refuses to eat any other mango chutney than the stuff I make, so I'm pretty stoked (my dad can be a bit fussy about his food!). The thing I love about making chutney is its simplicity: Chop up a whole lot of stuff, put it in a pot, forget about it for a while, come back, cook it for a bit, bottle it, eat it. This is my own recipe. I read about 4 different recipes for mango chutney (long since forgotten where I found them) and merged bits and pieces of them to create this:
 - 4 cups peeled, chopped mangoes (6-8 mangoes, depending on the size)
- 2 green capsicums, chopped
- 1 red capsicum, chopped
- 2 cloves garlic, minced
- 2 cups white vinegar
- 1 tbsp mustard seeds
- 3/4 tsp ground cloves
- 3 medium brown onions, diced
- 1 1/2 cups raisins
- 1 2 inch piece ginger root, minced
- 2 cups sugar
- 1 1/2 tsp ground cinnamon
- 1/2 tsp ground chili
- Combine all ingredients in a large glass bowl and stir well. Cover and let stand overnight.
- Pour mixture into a Dutch oven and bring to the boil, then turn down to low heat, stirring occasionally until the consistency of jam (about 1 1/2 hours).
- Spoon into hot, sterilized jars, leaving 1 cm gap at the top of the jar. Remove air bubbles, wipe jar rims and seal with lids with screw-on bands. Process in a boiling water bath for 10 minutes.
Sunday, 20 January 2008
Speaking of aprons...
Here's a reversable cafe apron I made for my friend, Özlem. I scored the cute black and white flower print skirt material from ebay. The top edge flips over to make like a waistband that contrasts the apron, on either side. I didn't intend for it to do that, but it worked out well, I think. A "mistake" I intend to reproduce in the future. The black side has a pocket in the shape of an oven mitt - an idea that I got from one of my favourite books. I couldn't believe the whole thing took less than an hour to finish! Apologies for the poor photo quality. I don't think it helps that I'm wearing a dark jumper either.


Saturday, 19 January 2008
Apron swap

So I heard about the Sassy Apron Swap and got pretty damn excited. I prefer to give the things I make away to friends because I enjoy the creating process rather than admiring the finished product, and it gives me motivation to finish my project because I have a deadline, like a birthday... or apron swap! Oh, how I love aprons: they combine two of my loves - cooking and sewing - so when I saw the Sassy Apron Swap for Spring, how could I say no? And it's always exciting getting a parcel in the mail!
The idea is to make an apron and send it to a designated person and in retun you receive an apron from someone else (not who you sent yours to).
The requirements are:
Must be a 'Spring Theme'
Must be hand-made by your hands or those of another crafter
Pre-washed cotton fabric
A pocket of some sort
Embellishments are welcome but not required (rickrack, trims, buttons)
Adult sized apron
Sounds like fun, eh?
Friday, 18 January 2008
What has been and what's to come...
My biggest problem growing up was always my inability to finish whatever sewing project I'd started. Recently I worked it out what the problem was: Most of the projects I've attempted previously haven't been very functional, so I lost interest. Cross stitch or embroidery pictures or toys. Last October, inspired to make a baby present for my pregnant friend, I started thinking more about sewing and found some interesting blogs and books and it just went from there.
As I'm getting more confident with my sewing I'm branching out a bit more - coming up with a concept and THEN working out how to do it, rather than finding something I like and making it my own. I've discovered that it's ok to have a short attention because you don't have to spend 30 hours on something to make it look good.
I had quite a few projects on the go leading up to Christmas which I'd eventually like to retrospectively add to this blog, just so I can see my improvement over the months.
So, still to come (in order of my confidence level, but not necessarily the order in which they'll be posted)
- Paintbrush storage for my other buddy, Kat
- A little reversible apron for my buddy, Ozelm
- A sun hat to protect my delicate, pale skin
- A messenger bag to replace my falling-to-bits work bag
- Comfy black pants
Mr Fish
 I thought I’d document this cake too because I was quite pleased with how he turned out and will no doubt want to make it again in the future. This was a birthday cake for my friend, Amita, who loves fish! The innards of the fish is a caramel mudcake, and his outside is green meringue icing, licorice, sour straps and a chocolate eye.
The caramel mudcake recipe comes from Women's Weekly 'Cafe Cakes' (p. 46). I have tried several caramel mudcake recipes, but this one is the perfect density for a mudcake and isn’t overly sweet or sickly.
Whenever I’m making birthday cakes, I like to make them at least 2 days in advance and store it in an airtight container in the fridge. This means that if I bugger it up I have time to make another one, and more importantly it’s easier to cut and carve without it crumbling (a problem even with mudcakes!).
I prefer to make meringue icing because, again, it’s not as sweet as butter icing (despite what its name might suggest) and it also holds its shape better.
Ingredients for the cake:
- 185 g butter, chopped
- 150 g white chocolate, chopped coarsely
- 200 g firmly brown sugar
- 80 ml golden syrup
- 250 ml whole milk
- 25 g plain flour
- 75 g self raising flour
- 2 eggs
You’ll also need a 9” baking tin, lined with paper and a 2” collar and a good, sharp knife.
The icing:
- 220 g castor sugar
- 4 egg whites
- 330 g butter at room temperature, chopped into about 12 pieces
- Blue and green food dye
Making the cake
- Preheat oven to 160C, fan forced (moderately slow oven, I usually need to set mine to 150C).
- Line the base and sides of your 9” baking tin with baking paper, with a 2” collar.
- Combine butter, chocolate, sugar, golden syrup and milk in a medium saucepan, stir over low heat without boiling, until it’s smooth. Transfer the mixture to a large bowl and allow to cool for at least 15 mins. I usually leave it for about 30 mins because the mixture is still way hot after 15.
- Whisk in sifted flours, then eggs, one at a time.Pour mixture into the prepared pan and bake for 1.5 hours. If still not cooked, keep checking every 10 minutes until done.
- Allow to cool completely in the pan (this increases the density and keeps the moisture in the cake).
- Turn onto cake rack.Wrapped in a layer of cling wrap, baking paper and foil, and place in the freezer. This cake can be kept in the fridge in an air tight container for up to three weeks.
I’ve never really had much problem with this particular mudcake say, rising in the centre, but if it has happened, just cut that bump off (it means you get to pre-sample the cake too!).
Turn the cake upside down, so the bottom of the cake – the flat side – is face up. This is a good, crumb free work surface to work with.
Cut the cake as below:

Transfer the cake to your mounting board and brush away any crumbs. Place a few strips of greaseproof paper underneath the cake. If you make a mess with your icing it means you can slide it out later without messing up your board.
Attach the other tail fin using a toothpick or shortened bamboo skewer.
Making the icing:
I should give you forewarning and say that this icing can be very strange. Sometimes it whips up in no time, and I think, depending on the weather, it takes ages to beat at other times. I’ll be standing there beating away, wondering whether I measured something wrong and debating whether to take action, and then a few minutes later it’ll suddenly fluff up. If it’s not fluffing up, don’t lose faith, just keep beating! It will eventually work!
- Place the egg whites and castor sugar in a bowl and dissolve sugar into the whites on the stove over a saucepan of water, making sure the bowl does not touch the bottom of the pan and that the egg whites do not cook!
- Beat the egg whites and sugar until they form stiff peaks (5-10 mins)
- Gradually add the butter one piece at a time, beating after each addition. It will take until the last few pieces are added before the mixture will really start to fluff up. Add a few drops of blue and green food dye, or whatever colour you’re making, until you’re happy.
Decorating:
- Smother the cake with icing, using a long metal spatula, or a butter knife works just as well. To get it nice and smooth, dunk your spatula in hot water.
- Cover your cake with the scales. I started from the tail and worked back.
For the tail fin and dorsal fin, I simply used strips of the sour strap, cut to the shape of the fin. - His little swimming fin (I can’t remember what that’s called) is just an oval shaped sour strap, about 5cm long. I just placed it on top of the scales. It’s not secured.
- His eye I made by melting a small amount of dark chocolate and dotting it onto a white chocolate melt with the end of a chopstick.
- His mouth is lined with wide licorice straps.
And you're done!
Wednesday, 16 January 2008
Gib's bug cake

I made this cake for my partner, Gib, for his birthday. It's some sort of creepy crawly larvae type thing. The cake is a raspberry chocolate bundt cake, with raspberry icing and white and dark chocolate. Yummo!
For the cake (Serves 12)
275 g frozen raspberries
3/4 cup butter
1 cup granulated sugar
3 eggs
2 tsp vanilla
2 1/4 cup plain flour
2 tsp baking powder
1 1/2 tsp baking soda
1/2 tsp salt
1 1/2 cup sour cream
1 cup dark chocolate chips
Icing and decoration
3/4 cup dark chocolate chips
3/4 cup white chocolate bits
2 cups icing sugar; sifted
25 g Raspberries; fresh/frozen, pureed
2 tsp Lemon juice
1 pkt strawberry flavoured Pocky* (for the antennae)
Large white chocolate melts (for eyes and mouth)
Natural Confectionary Company ‘Fruit Salad’ soft jellies. (for the legs)
Making the cake
- In bowl, cream butter with granulated sugar until fluffy. Beat the in eggs one at a time, and vanilla.
- Spread half of the mixture into greased 10-inch Bundt pan. Sprinkle the berries on top of the mixture, then spread the remaining batter over the top.
- Bake in 180 C oven for 40 minutes or until cake springs back when lightly touched. Let cool for 15 minutes. Invert onto rack to let cool completely.
Decorating the wiggly worm
Cut a wedge in the cake, about 1/3 of the cake. Turn the wedge around and butt it to the end of the main piece - it should look sort of like a question mark (or a wiggly worm!). Transfer the cake onto your presentation board. Put strips of waxed paper under cake, this will catch the icing and chocolate so as not to dirty your board.
Make the icing: Add icing sugar to pureed raspberries, mixing well. Then add lemon juice until consistency to spread thinly on cake. Wait until the icing has set before adding the chocolate layers!
Melt the chocolate and leave it to cool slightly. If it’s too warm it will melt the icing underneath. You may need to remelt the chocolate a couple of times during this process. Drizzle the chocolate to create stripes. Do the same for the white chocolate.
To make the antennae, I dipped the ends of some Pocky sticks into the white chocolate a few times, waiting about 30 seconds between each layer, with a final dip into dark chocolate.
To make the eyes, I used large, round white chocolate melts. I dipped the flat end of a chop stick into the melted pot of dark chocolate and then dotted it onto the white chocolate melt. It took a few attempts to get them looking good.
The mouth was simply a white chocolate melt cut in half.
Use your favourite coloured jellies for the 6 legs (I used them whole).
Inspiration for this cake came from here: http://novapages.com/index.php?itemid=228&catid=31
*Pocky is a Japanese sweet snack. I buy it from my local asian grocer for 99c a pack.
Saturday, 12 January 2008
Getting it together
I've finally decided to create a place dedicated solely to tracking my creative endeavours. I got tired of making things or doing things and forgetting how I did them, or why, or where I got the idea from. I rarely stick to a pattern or recipe but I can never remember what changes I made! So naturally, my scientific background told me to create a blog, my laboratory book for my cooking, sewing and gardening (let's face it, they're all really a science but in a different context). I tried a paper scrap book to put all my bits and pieces in, but it just didn't work. I couldn't quickly do a search for 'mango chutney' and my favourite recipe just pop out at me. So here it is!
Subscribe to:
Posts (Atom)