Saturday 28 June 2008

Wasp cake: final product

Well it is complete. I wasn't sure how it would turn out, but as with most things I make, I just started and just rolled with it. I should mention that this is simply a description of how I made the cake, and I'm certainly not saying that it's the best way or the quickest. I wanted to write down the process so I can learn from my cake making endeavours for the future, and if someone else can gain some inspiration on the way, then all the better. I really have no idea about cake making: I just think of something and try to make it using cake as my medium.

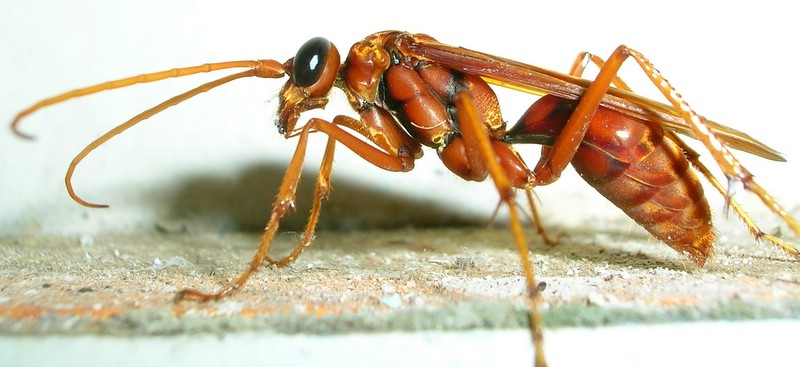
How to make your very own Spider Hunting Wasp cake:


I made the cake (the innards) a few days ago. As I've mentioned before, if I'm making a character cake, I always like to make the cake in advance because it's so much easier to carve and work with and also means that I have time in case it doesn't work (my cakes have a habit of not working under pressure!). Because of the shape of the wasp, I decided to make the cake in two loaf tins. I made a lemon loaf cake based on these two recipes. I like my lemon cakes to be really lemony, and this one is certainly lemony!

Beth's superzesty lemon cake

Makes 2 loaf cakes. Can be frozen.

250 g butter, at room temperature
2 cups sugar
1/3 cup grated lemon zest (6-8 large lemons)
1/2 cup lemon juice
4 eggs
400 g Greek-style yoghurt
3 cups self raising flour, sifted
1 tsp baking soda
1 tsp vanilla extract
  1. Preheat oven to 180°C. Line base and sides of 2 x 7cm-deep, 10.5cm x 20.5cm (base) loaf pan with baking paper, allowing a 2cm overhang at both long ends.
  2. Cream the butter, sugar and lemon zest with an electric mixer until light and fluffy. With the mixer on medium speed, add the eggs, 1 at a time.
  3. Combine lemon juice, yoghurt, and vanilla in a separate bowl.
  4. Add the flour, baking soda and yoghurt mixtures alternately to the batter, beginning and ending with the flour.
  5. Divide the batter evenly between the pans, smooth the tops, and bake for 45 minutes to 1 hour, until a cake tester comes out clean.
To make the wasp:

For the body:
  • 1 packet of Orchard icing
  • Food dye
  • 1 packet of dark melting chocolate
  • 1 Kinder Surprise or Easter egg (for the eyes)
  • Apricot jam

  • Prepare your mounting board if needed. I use a large wooden chopping board covered with gift wrapping foil.
  • Shape the cake and round any edges. You will need a head, thorax and abdomen. I made the head and thorax out of one loaf but cutting 1/3 of the end of the cake (for the head) and the rest for the thorax. I rounded the head and made the thorax pointed at one end. The second loaf was used for the abdomen. Mine ended looking up like so:
  • Using bamboo skewers, join the 3 body pieces together as below. I used two skewers to attach the head to the thorax, through the front of the head. I used one skewer to attach through the top of the abdomen through to the thorax.

  • Roll out the Orchard icing as per instructions. I chose to colour my wasp orange. Make strips for the segments on the abdomen.
  • Start with the abdomen. Brush the abdomen with apricot jam. Lay the strips of icing over the top of the cake and press gently so it attaches to the cake.
  • For the thorax, I rolled out a big square of icing, laid it over the top of the cake and with a sharp knife I cut it to shape. I rolled the icing back to apply the jam onto the cake, and then pressed the icing back into place.
  • For the head, I removed the cake head piece, rolled out circle of icing, brushed the cake with jam and wrapped the icing around it. I stuck the head back on.
For the wings:
  • 1 x 500 g packet of air drying clay
  • Aluminium foil
  • 500 g packet castor sugar
  • 1/2 cup water
I should mention that this is the abridged version of how I made the wings. I spent a bit of time over the past week tinkering with different ideas, different moulds, but in the end I decided to make my own mould for the wings out of cheap, air drying clay that I picked up at my local craft shop. I made two wing moulds (wasps have two sets of wings). I then wrapped the clay moulds in aluminium foil and poured the toffee in. Because I only had one mould, I had to make the wings in two batches.
  • Lightly coat the aluminium covered moulds with spray oil.
  • In a saucepan (don't use a dark coloured saucepan!), heat 250 g sugar and 1/4 cup of water together. Leave it to bubble, without stirring, until it turns golden brown.
  • Quickly pour it into the prepared moulds. Leave to set on the bench for 30 mins.
  • Avoid getting water on your toffee or it will turn to liquid.


For the legs, antennae and eyes:
  • Melt your dark chocolate. I'm lazy and melt chocolate in the microwave.
  • Lay down a sheet of aluminium foil on the bench. Using a teaspoon and a skewer, spoon out chocolate onto the foil and smooth out to make the shape of a leg. Leave to set for a few minutes, then turn the leg over. Apply chocolate to the other side to give the leg more "body".
  • For the antenna, carefully draw a thin line of chocolate across the foil with the edge of the teaspoon. Build up the chocolate with a few extra layers if it's too fragile. It doesn't matter if it looks a bit blobby or rough: wasp antennae are moniliform!
  • I attached the legs to the body by literally shoving the edge of the leg straight into the cake.
  • I gently pried open the kinder surprise using a sharp knife, then wedged the halves into the side of the head. I then attached the antennae in the same fashion as I attached the legs.
  • Using a paintbrush, I made lines across the back of the plates of the abdomen with melted chocolate.
Mounting the wings:
  • This was a challenge that I hadn't really thought through when I started the whole project. In the end, I jammed the wings into the back of the head, which seemed to work fine. I needed to remove them for transportation though. I would probably do this right before the cake is to be presented, or alternatively make the wings thinner in future, because the weight was a bit too much for the head in the end, and it ended up partly caving in. It was able to be patched, but just a reminder for myself for the future.

This photo is just before I brushed down the icing sugar off his face. A post-icing-sugar-face photo to come!

Friday 27 June 2008

Kat knows where it's at

Meet Kat. She's supersweet and supertalented and she's just created a brand spanking new blog for her artwork. I can't wait to see more!

She loves winter just as much as I do.

Thursday 26 June 2008

Fun flickr meme

I don't usually get on board with these, but this looked like fun. I spotted it on Katie's blog, who found it on Going Sew Crazy.

Instructions as follows:
a. Type your answer to each of the questions below into Flickr Search.
b. Using only the first page, pick an image.
c. Copy and paste each of the URLs for the images into fd's mosaic maker.


1. What is your first name? It's funny, I used to have pink hair (but that was many years ago now)
2. What is your favorite food?
3. What high school did you go to?
4. What is your favorite colour?
5. Who is your celebrity crush? Ok, so she's a chick. But through my teenage years I always wanted to be Lola. She's like my real life superhero. I ended up dying my hair from pink to red after seeing this movie! Lola is hot, fit, assertive and quick thinking! Yeah!
6. Favorite drink?
7. Dream vacation?
8. Favorite dessert?
9. What you want to be when you grow up?
10. What do you love most in life? There are many things in my life that I love, but it's karate, or rather "budo", that drives everything else in my life. And this karate figurine looks - kind of - like Gib! Haha, two birds with one stone!
11. One word to describe you.
12. Your flickr name.

Wednesday 25 June 2008

Some cute things in the past week...

My cousins came to visit and I was totally unprepared. So I decided to keep them entertained, and also fulfill my lifelong dream, by making giant choc chip cookies!


They went down a treat!

I was cleaning out my mum's fabric stash and found these! I was tickled pink! I love the duckies (they are printed along the edge of what I think used to be a tablecloth), but the fabric with the koala and squirrel on the mushroom is exceptionally cute.


I also stumbled across one of my grandmother's favourite cookbooks, which has her favourite sponge cake recipes! There are some classic recipes here that I can't wait to try out. Like little jam filled sponge cupcakes... yum! It's so good finding out more about my grandmother and trying to recreate some of the things she used to make.


Don't even ask...

One of my all time unfavourite things is when shop assistants ask you what you're going to do with something you're buying. Without fail, whenever they ask me this question, it's always when I'm doing something really freaking weird, and often when I'm going to use their product in a way that it wasn't intended to be used.

Today, in an art supplies store:
Shop assistant: "Do you need paint to go with these brushes?"
Me: "No, I'll be using them for cake decorating."
Shop assistant: "Oh. What will you be making with this modelling clay?"
Me: "Uhhh... making figurines?"
Real answer: I'll be using it to make a mould in the shape of wings of a spider-hunting wasp. It will then be lined with aluminium foil and filled with toffee, to be used as decoration on the cake that I'll be decorating.

In a fabric store, in reference to some terry towelling remnants I'm buying:
Shop assistant: "Are you making some things for your bathroom?"
Me: "Yup."
Real answer: I'm going to sew them into tunnels and hammocks for my pet rats.

In Bunnings, buying fence posting:
Me: "Hi there, I'm just after a 7 meter length of 4x4"
Shop assistant: "What's it for?"
Me: "Ummm..."
Real answer: Gib and I are constructing a makiwara in our backyard. You know, like in Karate Kid.

Maybe I shouldn't have such damn weird hobbies. Maybe I shouldn't be so embarassed about my weird hobbies. Or maybe the shop attendants just shouldn't ask in the first place (my preferred option).


Tuesday 24 June 2008

Chutney to try

I found this recipe for chutney at Willow House and boy does it look delicious! The chutney I made overy summer is starting to run out, and this looks like it'd be a great one to make.

Sunday 22 June 2008

Terry the Tarantula

Meet Terry the Tarantula. He will soon be posted to Mikes for their Softies for Mirabel appeal. I decided to make a spider because when I was getting inspiration for my little creation, I found so many patterns for softies for girls. Flicking through pattern books, I kept finding instructions for dolls, kittens, fluffy bunnies... and the softies I did find for boys were all made with pastel colours and weren't very boyish at all! And there's nothing more boyish than a big, black, hairy spider! I also figured a spider would be quite straight forward to make. The best part about working with the medium pile fur fabric is that most of your stitching and seams can be easily concealed. I documented how I made him in case your want to sew your own spider toy. He's about 25cm in length.

A disclaimer: I'm not well practiced in writing instructions so if there are any questions, please ask me! Also, apologies for my dodgy diagrams. The photos were of poor quality (black fur fabric + black thread isn't a great for photos) and Illustrator keeps crashing, so I have resorted to making the images with Paint.


How to make Terry the Tarantula

You will need:
  • Medium pile black fur fabric, 30cm x 110 cm
  • A small square of white polar fleece
  • Black cotton thread (good quality, as you will be doing some gathering and cheaper cotton may break)
  • 2 x 25mm white safety eyes
  • Small scraps of fabric for the fangs
From the black fur fabric cut:
  • 2 large circles, the size of a dinner plate (~30 cm diameter)
  • 1 small circle, the size of a tumbler rim (~10 cm diameter)
  • 8 strips of fur fabric, 15 cm x 4 cm
When cutting fur fabric be careful to only cut the backing material, not the pile. Make small cuts into the backing fabric using the tip of the scissors. I do not recommend doubling the fabric when cutting out your pieces.


Make the head/body (a.k.a. 'cephalothorax'):
  1. Take one of the large circles and make a running stitch right around the edge, approximately 1cm in from the edge, and .5 cm stitch length. Pull tightly so the edges gather up to create a ball, being careful not to snap your thread. Tie off. (The fur fabric will not gather up completely, so you will be left with a hole in the bottom that will later be covered over with the smaller circle of fur fabric).
  2. With each of the 8 strips of fabric, fold them in half with the pile facing outwards. Do a whip stitch along all 3 sides. The depth of your stitches should be small (~3mm) and closely spaced. You may need to brush the fabric pile downwards to expose the edge of your fabric and to prevent any of the fur getting caught in the seam.
  3. Sew each leg securely to the side of the body, 4 each side, using ladder stitch, about 3 cm from the edge of the hole in the body piece.
  4. Insert the safety eyes at this point. I like to half stuff the body so I can see how the fabric and eyes will sit when the fabric stretched out. I place the eyes, carefully remove the stuffing, insert the eye backings and then re-stuff the toy. There is a tutorial here on how to install safety eyes. When you are done with the eyes, finish stuffing the head/body.
  5. With the small circle of fabric, place it over the hole and the edges of the legs. Stitch it down with ladder stitch. Make sure that your stitches are small and catch all of the fabric underneath so that it is secure.
Make the abdomen:
  1. Take the second large circle and gather as per the head/body. Stuff.
  2. Attach the abdomen to the body with ladder stitch, making sure your stitches are small and tight as possible.
Attach the fangs (chelicera):
  1. Cut two triangles out of fabric scraps, 4 cm wide and 5 cm tall. I used old, green curtain fabric.
  2. Fold in half, stitch down the side. Turn out.
  3. Turn the top edge in and ladder stitch closed so you have a closed, triangular shaped fang.
  4. Ladder stitch to the head, just below the eyes.

Friday 20 June 2008

A week in my kitchen: My big orange pot

I was a very lucky girl indeed when I received this as a 21st birthday present. I use this pot for everything, from boiling pasta to slow cooking ratatouille on for hours on cold Sunday afternoons. The reason why I love it so much (apart from it being orange, my all time favourite colour) is because not only does it look elegant, but it's entirely functional. The heavy base keeps the contents warm for ages, and it cooks your food evenly. It can go in the oven as well as on the stovetop. And, most importantly, the enamel coating makes it easy to clean. Its size lends itself well to cooking up large batch meals, which I like to do on the weekends. If I have friends coming over I know I can make a massive risotto or batch of soup and still have leftovers. You also know that you will never in your lifetime need to replace it, and most likely not in your childrens' lifetime either.

Absorbing another fabric stash

One of my mum's friends, who she does embroidery with, has invited me to help clear out her fabric stash tomorrow afternoon. She told me I can take anything I want. Wow - I'm so excited! This lady has such a great eye for colour, I can't wait to see what her stash is like!

What I'm not so excited about is the dentist appointment I have in 2 hours time (I haven't been to the dentist in 12 years! Half my lifetime ago!).

Update: So I'm going to need six- yes, six fillings - and most likely have wisdom teeth removed (one is growing sideways!). That's what I get for not going for so long. It's so frustrating, I'm so anal about my dental care! My denist thinks I might be able to get it all done at once, if I do need wisdom teeth removed, but he's just waiting on the x-rays. That'd be nice, because I really don't want to be conscious if I have to have all of that done. Yikes! Sounds expensive too.

Thursday 19 June 2008

A week in my kitchen: Dragon pasta scoop

It feels so good to surround yourself with fun things in the kitchen, it makes the whole process of playing in the kitchen even more appealing. I bought this little guy when I first moved out of home and had my very own kitchen. He cost me all of $3 from Ikea and is on of my all time favourite bargain buys. I love his cute little face, the rubbery spines... even the shape of the prongs of the scoop are cool. He's both fun and functional - my favourite combination! I seemed to acquire a collection of blue kitchen utensils... blue crockery, blue cutlery, a blue popcorn machine, blue tupperware (of course I had a Tupperware party when I had my own place, and blue was in that year).

My birthday cake idea... and more than you ever wanted to know about wasps

My birthday is coming up fast, and as nontraditional as it is, I love making my own birthday cake. It's my present to myself, my opportunity to think up crazy ideas and try to turn them into a cake... sometimes my ideas are successful, sometimes not so successful. This year I'm going to attempt something a little more extreme, and many I know (like my mother) will say it's gross. Not quite as gross as the guy who makes body parts out of bread, but I guess the inspiration is kind of gory. This year I have decided to make a wasp cake. They are creatures that have evolved some of the most fascinating life cycles, they have beautiful bodies (I think so, anyway) and watching them in garden as I was growing up definitely fuelled my passion for gardening and the world of zoology (interestingly, Pip at Meet Me at Mikes had an interesting post along those lines the other day), so I've decided to honour them in cake form. And making a wasp into a cake is going to be a tough challenge - I love a good challenge!

Wasps aren't so gory, you say? Sure, they hang about during summer and you have to watch your soft drink, and they have a horrid sting, but they're not so bad. Wasps are amazing and gruesome parasites, and if you're at all queasy, I'd suggest stop reading now.

Why are wasps so damn cool?
Here are some examples. There's Hymenopimecis whose larvae live on spiders. The larvae change the host spider's behaviour so it weaves a web in which the wasp larvae can hang their cocoons. And then they eat the spider.

There is the Emerald cockroach wasp, Ampulex compressa, who has long been known to "mind control" its poor cockroach host. It eats the antennae off the cockroach then insert its spine into the ganglia (basically the brain) of the cockroach, semiparalise it, then guides the cockroach around like a horseman on a zombified horse, using the cockroach's remaining antennae like a leash, back to the wasp's burrow. It then lays its eggs in the abdomen of the wasp.

Then there is the larvae of Glyptapanteles partially develop inside caterpillars, then manipulate the caterpillar into caring and tending to the larvae as they grow. The larvae partially eat the caterpillar, eating their way out of it, but still keep it alive. They form cocoons, and the (possessed) caterpillar continues to watch over the cocoons until the adult wasp hatches, and then the caterpillar dies. There many more tales of wasps doing amazing things to their hosts, and I would suggest to anyone who is interested in knowing more to read Carl Zimmer's brilliant book "Parasite Rex". This book will totally turn your ideas about the food chain on its head.

The cake

I intend to make the body out of either a log tin or a large rectangular cake cut in half. The plates of the abdomen will be made from Orchard soft icing. The legs can be made out of many things: licorice or other similar confectionery, soft icing etc. I'm not too fussed about that. The wings will be the challenge (and the part most appealing to me): I'm going to try to make them out of toffee glass poured into a purpose built "egg ring" in the shape of the wings... unless I can think of a simpler solution. I'll have to try that out before the day I make it.


Wednesday 18 June 2008

A week in my kitchen: My grandmother's cake cooler

I didn't know my grandmother as I was only three when she passed away. Apparently she was a bit of a feisty woman, and also a great cook. My mum tells me she made the best sponges and had a real knack for baking breads and buns. There's something so very homely about this cooling rack, it's seen so many things in its lifetime. It's a bit wobbly but there's no sign of it falling apart any time soon. Hopefully it will be cooling many more baked goods for many years to come!

Tuesday 17 June 2008

A week in my kitchen: Global Knives

Gib gave these to me as a birthday present a couple of years ago and they make my cooking experiences an absolute joy. In my opinion, if you are going to spend any decent amount of money on just one thing in your kitchen, it should be your knives. They make everything from cutting your sandwiches in the morning to carving up a roast beef (or an awkward quince, for a non-meat reference) just so easy and enjoyable.

Globals are superbly balanced, surprisingly light in weight, keep their sharpness for longer, owing to the fact they're pressed as one piece instead of forged, and are made of a harder alloy of steel than, say, a Wusthof. Consequently I now hate cooking in other people's kitchens if they have blunt knives. I have come off second best to them a few times - they cut down to the bone so easily, like your finger was never there at all, but thankfully they cut so cleanly that even deep cuts heal quite fast. I keep strict rules regarding the use of my knives by other people and they're one of the few items I am fiercely protective of: whenever I go away I make sure to take my knives with me so no one else can use them!

It's that time of year - Prune your roses!

Peter Cundall is an absolute champ. His passion for gardening is just so inspirational and he's definitely been a great guide in my gardening endeavours. What I love about Peter Cundall is how he encourages people to not get caught up on the exacts of gardening and just to get out there, enjoy the plants, enjoy the relationship you have with your garden, and just do it. If you make a few mistakes, it doesn't matter, so long as you're getting out there and enjoying and learning. The other day I read another gem from him, on pruning roses:

"Now here's a little tip. If ever you're feeling depressed and a bit frustrated on a cold winter day, get out into the garden and start pruning the roses. Honestly, you'll feel so much better."

and then there was:

"
Just imagine a wandering cow has got in and is munching away quite happily. It’s brutal, and yet they love it."


It is indeed that time of year again. Winter is settling in and it's time to get fierce the roses. Gib got stuck into ours yesterday (he was feeling a bit vexed and took Peter's advice!) and reshaped our climbing rose, cut of branches that were growing the wrong way. He cut back another rose that was originally planted in the garden when the house was built back in the 60's. The poor thing hasn't much shape and produces only 5 - 8 flowers - very large, beautiful apricot coloured flowers - each year, and it definitely needs more light. It's also the time to transplant roses as well. My parents have been a bit scared of roses, much like their herb garden, and haven't yet realised the joy that butchering these plants brings to both you and them (I think they need to listen to Peter Cundall more).

Don't be afraid! Get out there and prune back your rose and it will love you and reward you for it.

Here are some great links to help you get inspired:


Monday 16 June 2008

A week in my kitchen: Green canisters

Each day this week I'm going to post about the things I love in my kitchen. They're things that keep me inspired, that keep me coming back to the kitchen to bake and cook and make the whole experience of experimenting with food that much more interesting. Some of the things in my kitchen have been passed on through the family, others are relatively new.

But I'm going to kick it all off with these green and brown canisters. I think they were given to my parents as a wedding present. There are four of them: two big ones, two little ones. They have always lived on a shelf next to the door leading to the laundry from the kitchen, they have always housed the flour and sugar, and have always been labelled with the same little blue labels made using one of those old, dodgy DIY label writers. It was only recently that I realised just how long we'd had them and how good the seals on them still are. The plastic hasn't cracked and the colours definitely haven't faded. Not only that, but it was only recently that I noticed that these canisters are the same colour green as all of the cupboard and pantry doors in our kitchen! I'd looked at them every day during breakfast and dinner time, I'd frequently pulled them down off the shelf for years to use for cooking, and I'd never noticed. It really is quite an outrageous green, but apparently it's an improvement because, before I was born, the cupboard doors were originally painted fuschia pink!

This is one labeled 'Soy grits' from when mum and dad used to follow a Pritikin Diet, but it has always been filled with caster sugar ever since I can remember (how ironic!).

Fantastic pizza dough FAQ

Last month I wrote about how easy it is to make pizza dough. It seems that Deb from Smitten Kitchen agrees, and recently posted this fabulous FAQ called '10 Paths to Painless Pizza Making'. Deb lives in an apartment with a small kitchen, and doesn't use any fancy accessories to make her dough.

Sometimes I have run out of yeast and have a massive hankering for home made pizza but can't be bothered going to the supermarket. The pizza shop is walking distance, and they do make lovely pizzas, but I want my OWN toppings. So Deb's #10 tip I love; it had never occurred to me:

"Go to your local pizza shop and ask to buy a dough."

Brilliant.

Friday 13 June 2008

"Pimp My Chair" project

Gib complained that I'm always making things for everyone else but him. He said that his computer chair was boring. He needed a chair with more, something that reflected his personality. He wanted me to pimp it out. So I said "Fo sho, dawg!"

Gib says his computer chair is way too boring... y'know wut I mean?

I draped the fabric over the chair and kind of hacked away at it with scissors until I got the right shape. To keep it in place, I cut what looked like coat tails in the camo fabric so it wraps underneath the chair, around the centre pole and attachs to the bottom of the white fleece fabric at the front. Gib also goes by the nickname of Saru, which means monkey, hence the monkey applique. The black fabric used in the monkey's "fur" is a light canvas recycled from an old bag that I had worn out. It took me about a weekend to make. And Gib is happy with the results (fo shizzle!).

Thursday 12 June 2008

Beth's Bushwalker Bickies

Ok, I'm a little late on this one. This is for the June Recipe Box Swap at I have to say. There wasn't a theme this month, so it was easy to choose a recipe.

I had an unusually quiet Thursday evening and I spent it baking biscuits and reading the newspaper. Nothing exceptional in the paper, but I managed to finish the sudoku. What was exceptional was how these biscuits turned out. They are sweet, but not too sweet, and a little bit nutty tasting. They have a wonderful, slightly chewy texture but the cornflakes and oats make them a bit crunchy at the same time. I think could happily polish off the whole batch on my own.

Beth's Bushwalker Biscuits
1/2 cup margarine
1 cup brown sugar
1 egg
1/2 tsp vanilla essence
2 tbsp water
1/2 tsp baking soda
1 cup dates, chopped
3/4 cup wholemeal self raising flour
1/2 cup plain self raising flour
1 cup Carman's rolled oats
1 cup cornflakes
1/2 cup coconut

Preheat oven to 120-140°C (these cookies are very high in sugar and will burn easily). Grease baking tray.
Blend margarine and sugar together. Mix in egg, water and vanilla essence until combined.
Mix through dates, then the remaining ingredients.
Roll into balls then flatten on the tray. Bake for 20-25 minutes. Allow to cool on a wire rack.

Makes 25-30 (I got 26 in the batch I made, but I think there would have been more if I hadn't eaten the dough... it was so yummy)

Wednesday 11 June 2008

A cake: inspired by Gib's Aunt.

I doubt whether there are any Australian mothers left out there who don't this cook book:

It's a classic in every household. Gib and I were housesitting for Gib's Aunt over the weekend and it was sitting on a little table next to the bed. I really should not have been surprised to find this book next to the bed as Gib's Aunt is one of the most amazing cake makers you'll ever meet. I had hoped that her amazing cake-baking skills would infuse into me during my time at the house, and it seems that that may have happened.

I had six passionfruit and two ripe bananas sitting in the fruit bowl and, lo and behold, on page 60 of the Women's Weekly Cakes and Slices cookbook there was in fact a recipe for Passionfruit and Banana cake that required five passionfruit and two ripe bananas. Here is the recipe, from Australian Women's Weekly (1991) "Cakes & Slices", p. 60
  • 125 g butter
  • 1 cup castor sugar
  • 1 egg
  • 2 mashed bananas (3/4 cup)
  • 3/4 cup chopped walnuts
  • 200 g passionfruit yoghurt (I substituted for 175 g natural yoghurt and the pulp from 3 passionfruits)
  • 1 cup wholemeal self raising flour
  • 1 cup plain self raising flour
Passionfruit icing
  • 1 1/2 cups icing sugar
  • 1 tsp soft butter
  • 2 passionfruit
Grease a 20cm round cake tin, line base with paper. Grease paper.
Cream butter and sugar in a small bowl with an electric beater until light and fluffy. Add egg until combined. Transfer to a large bowl.
Stir through banana, walnuts, yoghurt, (passionfruit), then sifted flours.
Spread mixture in to a prepared pan and bake in a moderate oven for 1 hour (although it took 1 1/4 hours). Stand for 5 mins before turning out. Top with icing when cake is cool.

For the icing:
Sift icing sugar into a small bowl. Stir in butter and enough passionfruit to make a stiff paste (mine was a bit runny, I think. Oh well.)

Here are the results:


I reckon this was one of the best tasting cakes I've ever made. Moist, tangy and neither dense or fluffy. The icing was very sweet, but it was thin enough that it didn't bother me. Delicious.

Tuesday 10 June 2008

Weekend Kraft werk: "The Robots"

(Hee hee, sorry, I just could not resist slipping that one in!)

I whipped up a bunch of little soft shoes over the long weekend using this pattern. The instructions were very easy to follow and these shoes were easy to make. I did need to go out and purchase a leather needle for my machine before I got started though. In the last Sassy Apron Swap, Katie very kindly added some extra material from which to make the soles out of, and I had a few suede scraps that my mum donated to me as well (she makes teddy bears and uses suede for the paws), so I was all set to go.

They proved to be very quick and easy to make, about an hour each, and I'm sure with some practice and more organisation they'd be quicker. The little black dinosaur shoes were my first attempt, and I was much happier with the ones I made after that. I got a bit creative, appliqueing little robots and dinosaurs onto everything. After taking a look at my fabric collection, it seems I have a thing for robots...

Two of the five have already been passed on and went down a treat with my cousin's little boy. I will post the other three off to my friend, Von, today. She likes robots too! (Only four pairs are shown because I made two identical pairs of booties with red robots)

Summary: Quick, easy and fun. Would definitely make again.

Friday 6 June 2008

Summer Sassy Apron Received!

My apron arrived in the post late yesterday afternoon. I was very excited... and even moreso when I found out it was from the talented Katie, who has been pottering about here of late, leaving kind words on my blog. I even remember checking out her blog and seeing her ideas for the apron she was making and thinking "THAT'S COOL!" and never knew it was to be destined for me! How cheeky! I absolutely love my apron, and I know it will be getting a great deal of use. I love the texture of the base fabric and the pockets are too damn cute. And the matching tea towels that came with it are equally as cute. I'm tickled pink. Definitely one very lucky girl.

Yesterday morning Gib and I picked up a couple of coconuts that were on special down at the supermarket. We didn't really have any plans for them, I think Gib just wanted an excuse to use power tools in the kitchen, Iron Chef style. But in my parcel Katie also included a recipe for non-alcoholic pineapple pina colada, so I now have a plan for at least one of our coconuts!

Thanks again, Katie!

Might not be posting much over the long weekend. I'm housesitting and I don't think their internet is so crash hot. But I'm staying not far from Mailing Road, Canterbury (there are many coffee, cake, craft and antique shops) and the Camberwell Market so I'll be having too much fun to have time to post. Have a good weekend.

Tuesday 3 June 2008

Links...

I've finally got myself organised and uploaded a complete album of my Food Photos of Japan.

I have a strange desire to make bunny rabbit cupcakes to go into some bunny print cupcake pans I have.

Some vegetable comics. They're so dorky that they're funny.

I am currently enjoying Culinary Concoctions.

Craft City Melbourne is also of great excitement to me

I have been asked to make another hippo... I don't think it will be as stressful this time around!

I want to try my hand at making my own ricotta cheese.

Chickpeas. Love 'em.

For many years I've been told about how good dried legumes are compared to their tinned counterparts: they’re cheaper, easy and the taste and texture are second to none. But I always put dried legumes in the too-hard basket and bought the tinned variety instead. Chickpeas are my favourite, I eat them all the time (I eat them out of the tin!), so finally I decided to give the dried ones a shot. I discovered how genuinely easy it is: I just put my chickpeas on to soak before I go to bed, and then cook them up in the pot for 20-30 mins while I get ready to go to work and they’re done. There is no big change to my routine and no “extra time” required. Even if I forget them for a few days, it’s no big deal – they just keep soaking.

For a mid-afternoon snack, I love hommus on crackers, pita crisps or with celery or carrot sticks. It takes about 5 minutes to whip this up and stores in the fridge in an airtight container for up to 5 days.

Quick and easy hommus


3/4 cup chickpeas, soaked overnight, cooked + 80 ml water
or
400 g can chickpeas, drained, half the fluid reserved.
1½ tablespoons tahini
Juice of ½ lemon
2 tsp olive oil
1-2 cloves of garlic

You could also add: Cumin, chili flakes, smoked paprika, dukkah, parsley, coriander

Combine all ingredients in a food processor and blend until smooth.

Make your own pita crisps:

I usually have pita bread on hand, but sometimes I notice it’s getting towards its used by date fast so I turn them into pita crisps. Once cool, store your pita crisps in an air tight container or ziplock back for up to 5 days .

Cut your pita bread up into chip-sized triangles. Place on a tray, spray lightly with spray oil, sprinkle with salt and bake for 5-7 minutes at 180°C. For a super-healthy low-sodium version, you can just place your pita triangles on the tray without oil or salt (but, I am a massive salt fiend so this personally isn’t my preferred option!). Be sure to watch your pita crisps carefully as they can brown very quickly.

Monday 2 June 2008

I made an elephant roll!

A while back I was inspired by the Meet Me at Mikes - A week of pillowcases, the roll in particular. My camera case is a boring, dull grey, and I want to make it a more exciting grey with a cute elephant print I have. So I downloaded the instructions and away I went. I couldn't be bothered with the embrodiery - I am lazy and impatient and just wanted a quick solution for storing my camera, phone and a notepad in the one place. It took about a bit over an hour for me to complete:
I actually prefer goats to elephants: it's just coincidence that I have an elephant phone dongle and made the roll with elephant fabric

Sunday 1 June 2008

How odd.

As I was walking home from the shops yesterday, I did a double take when I spotted this:


Cool, eh?