Saturday 31 May 2008

Leftovers and seconds

I loathe to throw out any fruit or vegetables (except for maybe those furry gray carrots that get pushed to the back of the fridge and forgotten about for a few weeks) and so I'm always trying to think of inventive things to do with nearly-past-their-used by date items in my fridge and fruit bowl. My food delivery comes on Fridays, so often Friday or Saturday is when I cook to make way for the new stuff.

I'd been pondering what to do with some broccoli I had in the fridge: I hate the stalks and I'm always trying to find ways to conceal them in things so I can't taste them and don't have to throw them out. I also had some daikon and carrot lying about so, before I headed off to work I whipped up some quick Japanese pickles. I'm not sure if this is how it's supposed to turn out, but I'll let you know how it tastes in about 4 days.


My favourite thing to do with tired fruit, apart from stewing it and eating it with ice cream, is turning it into muffins. Three lonely kiwi fruit were still left. They'd been left in the bottom of the bowl and almost forgotten. I also had a banana that I had frozen in the back of the freezer. I made this recipe from a base muffin recipe that I have and hoped for the best. Although the photo doesn't look that exciting, these muffins are actually very tasty and are definitely on my "to make again" list. The kiwi fruit gives them a bit of zing, the banana keeps it smooth and sweet, and the ginger gives them a lift.

Kiwi fruit and banana muffins

Wet ingredients:
  • 100 g butter, melted
  • 1/2 cup sugar
  • 1 egg
  • 1 banana, mashed
  • 3 kiwi fruit, diced
  • 1/2 cup low fat milk
Dry ingredients:
  • 1 tsp baking powder
  • 2 cups self raising flour
  • 1 1/2 tsp ground ginger
  1. Preheat oven to 180°C. Grease a 12 hole muffin pan.
  2. Combine the wet ingredients.
  3. Mix in the dry ingredients. Mix until the dry ingredients are just combined.
  4. Bake for 15-20 minutes until cooked through. Let to cool in the pan for 5 minutes before transferring to a rack to cool.


Apple and rhubarb compote

This morning I visited the Holmesglen Tafe farmers market and, in addition to the delicious goats cheese, locally made olive oil, freshly baked sour dough, zucchini pickles and organic kipfler potatoes, I also bought 1kg organic fuji apple seconds. I used a portion of these to stew up with some rhubarb I had lying about in the fridge.

I adapted this recipe from the recipe for rhubarb compote in Beverley Sutherland Smith's "A taste for all seasons".
  • 250 g apples, peeled and diced
  • 1 rhubarb bunch (500 g)
  • Juice of 1 orange
  • Several strips of orange rind
  • 1/2 cup sugar
Place all ingredients in a dutch oven or heavy based saucepan (I added a little bit of water just to get it all started). Bring to the boil then reduce to a low simmer for ~30 mins until the rhubarb is just soft. Remove orange rind and serve. Can be frozen for up

Friday 30 May 2008

Fruitastic Fridays

This is (one) reason why I love Fridays so much:

I get my fruit and vegetables - and eggs and honey too! - delivered to my front door by a company called Fruitastic every Friday morning. It's one of the many growing companies around Melbourne who provide this service, but I like Fruitastic because they offer their fruit and veg at the same price as the markets, the quality of the produce is consistently excellent, they don't charge for delivery and you can change your order as many times as you like (up until Wednesday morning). I used to go to the market every Saturday morning, but sometimes the quality wasn't so great, but Fruitastic just have excellent quality all of the time. I just email my order in every week and that's all! Sometimes I have specific things that I want, other times I just ask for a mixed box and it's a surprise what I get.

I really appreciate this type of service. It makes so much sense to have a central warehouse where fresh produce is taken from the growers, and then delivered to your door the same day. As opposed to Farmer --> Supermarket warehouse --> Supermarket --> I drive to supermarket and back. Not only is my food fresher and better quality, but it reduces all of those food miles!

Wednesday 28 May 2008

Sticky plant questions answered!

A while back I made mention of our little carnivorous garden living on our kitchen window sill. One in particular, the Drosera scorpioides, has been struggling ever since we got it. It has been attacked by aphids several times, it's been slow to grow and it has lost its little sticky growths to catch bugs that it had back in March. So last night we decided to visit the monthly Victorian Carnivorous Plant Society meeting to see if they could tell us what we were doing wrong.

Drosera scorpioides - not enough light

From what we learned last night, it seems that all of our plants simply need more sun, especially the D. scorpiodes and also all of our plants need surprisingly less water than we realised, especially during winter. In fact, overwatering is probably the reason why our Cobra lily (Darlingtonia californica) died practically overnight just a few weeks back. What fascinated me was the extensive root system all of these plants have. For such small plants, their roots are massive! Everyone at the meeting was very friendly and helpful and weren't total nutters, so it was a very enjoyable night. We met one guy from Hobart who was visiting for the evening, so when we got to Tasmania in October, he has offered to give us a tour of the carnivous plants in the area. Apparently the better time to see canivorous plants in Tasmania is in late February, but we should still be able to see a few things.

Our cobra lily - RIP. Sorry for overwatering you!

Some very cool plants

One of the members generously donated this little one to us! Not sure what it is exactly, it's from South Africa though. Hopefully we will have more luck with this one than the scorioides...

An ode to halloumi

Oh halloumi!
You delicious, salty cheese
I could eat you all day with such ease
In a salad with cous cous
Or on pita with herbs
Just make sure it's an extra large serve!

Oh yes, I am currently in love with halloumi. How could you not enjoy something that is this high in fat and salt, and has such a wonderful texture when grilled? (I have some very bad habits!). Thankfully I live right next door to one of the largest Greek neighbourhoods in Melbourne, so the lady at the deli put me onto the right stuff and apparently Cypriot halloumi is totally where it's at.

Unfortunately I ate all of the halloumi before I took any photos...

Monday 26 May 2008

Diabetic castle cake

I finally christened my new Nordic castle bundt cake tin. It was Gib's dad's birthday, but he has recently been diagnosed with diabetes, so I made a diabetic-friendly sponge cake with diabetic jelly. I wasn't sure how it would turn out, especially baking a sponge in a bundt tin, a tin that I've never used before, but it worked out fine! The sponge cake recipe was a new one I was trying out and it wasn't as great (it was definitely edible, and tasted good, but not great like my usual recipe).

Sunday 25 May 2008

Pizza dough fun

One of the things I enjoy most is making my own pizza dough. It only takes 15 mins to make and the dough freezes very well for up to a month. When I was a student living out of home, I'd make this dough up and keep half in the freezer for later and it made a cheap and very filling meal.

Friday night I made pizza for dinner and this morning, with the leftover dough, I whipped up a batch of 6 calzone to take for lunch this week... unless Gib gets to them first.

For the dough:
4 cups flour (or for wholemeal pizza dough: 2 cups each of plain and wholemeal flour)
1 1/2 cups warm water
1 x 8g sachet yeast
2 tsp sugar (or 1 1/2 tsp honey)
1 tsp salt
2 tbsp olive oil
  • Dissolve the yeast in the warm water. Set aside for 10 mins.
  • Sift the flour, sugar and salt together.
  • Make a well into the centre and gradually mix in the yeast/water mixture. Mix in the honey and olive oil at this stage.
  • Turn the dough out onto a floured surface and kneed until smooth.
If storing for later, wrap your dough in cling wrap and place in a zip lock bag in the fridge for up to 2 days or in the freezer for up to 1 month.

Divide your dough and shape it into a pizza base or for calzone, or whatever you feel like.
I bake my home made pizzas for 15 minutes at 200C.

My "calzones":
I lie, my calzones were more like pasties, but using bread instead of pastry. I'm having a bit of a fad for legumes at the moment, but you could replace the lentils with minced meat or bacon or whatver you feel like.


  • 1 onion
  • 2 cloves garlic
  • 2 tbsp olive oil
  • 1 cups of lentils, mixed variety, soaked overnight
  • 1 carrot, finely diced
  • 1 turnip, finely diced
  • 1 cup of peas (frozen)
  • 1/4 cup red wine
  • 500 ml vegetable stock
  • 1 cup pasta sauce
  • 1 tsp worcestershire sauce
  • 1 tbsp fresh rosemary
Saute onion and garlic until onion is clear. Add lentils, carrot, turnip, stock, red wine, pasta sauce and worcestershire sauce. Bring to the boil, then reduce to a simmer. Cook for ~30 mins or until lentils are soft. Add peas at the end.

Some people prefer to make their calzone in a semi-circle shape, but I've had too much trouble in the past with my filling oozing out of the sides, so I prefer this method: Roll out the dough in a roughly square shape, about 30 cm x 30 cm. Place a large spoonful of the mixure in middle. Fold the two side edges in. Fold the bottom edge up and then continue to roll the calzone over to close over the last edge (so the seam of th calzone is on the bottom).

Transfer your calzone to a tray lined with a baking sheet. Brush the calzone with 1 lightly whisked egg. Bake for 15 minutes at 200 C.


In other exciting news, I came home from a party Saturday night to a distinct smokey smell. Really smokey. My mum had been having a bit of a dinner party, and according to my dad, she got talking, and burnt the syrup that was supposed to go on the dessert. Not just burnt, but really burnt. So much so that one of the cats had to be taken outside because he was coughing! Check this out! Miraculously, the teflon coated cast iron pot was still in perfect condition!

How to make a heat pack for your pet rat

We have two small friends who have recently joined us in the bungalow: Kit and Pippa. They are 8 week old black hooded rats. Unfortunately rats have had a bit of a poor reputation throughout history, mainly from being blamed for the plague - which was actually spread by fleas - but they make fantastic pets. They're exceptionally clean creatures, they don't smell (unlike their cousins, the mouse) and they are exceptionally smart. I've had pet guinea pigs in the past, but they're daft creatures - cute, but daft. I like a pet that can think independently but still hang out with you and be sociable... and are cheap to maintain. A rat totally fits the bill.

Our little critters need to keep warm because they're so small and because it's so cold here in Melbourne right now. So Saturday afternoon I made them a heat pack (with assistance) to keep them warm at night.

To make your own heat pack for your small pets:
I made my heat pack with a double layer of fabric in case they decided to have a nibble. I made mine out of a light canvas, but you could use cotton drill, corduroy or any other similar fabrics.

You will need:
  • 2 15 x 25 cm rectangles of fabric
  • 2 12 x 22 cm rectangles of fabric.
  • Lentils, ~300 g. You could also use rice or beans, but I'd not recommend wheat as they will be more inclined to eat that.
Make the inner pack: Sew around all four edges of the 12 x 22 cm rectangles, leaving a 5 cm gap. Clip the corners and turn out the rectangle. Fill with lentils. Stitch down the edge.
Make the outer cover: Sew around 3 edges of the 15 x 25 cm rectangles. Insert the inner pack. Fold in the edge of the outer cover and top stitch down to close. Top stitch around the remaining 3 edges.

To heat:
Microwave for 1.30 mins on 80% (800W microwave).

I had some assistance with this one

Perhaps I should make one for myself?

Friday 23 May 2008

Recipe competition = new car?

My car died - totally. Yep, it needs the engine and turbo replaced. Thankfully I don't use my car all that often (I live only a fifteen minute walk away from my office!), however a car would be nice... especially one I don't have to fix/pay for. So on the Taste.com webiste - one of my all time favourite recipe resources - I spotted a competition where I can submit a favourite family midweek recipe, and maybe become Australia's "Home Cook of the Year" maybe win a new car! Woo! Well... so my chances are slim, but hey, you gotta be in it to win it.

Wednesday 21 May 2008

Gray's Anatomy -- in bread!

Quick! If you've got a weak stomach, stop reading now!

My dear friend linked me this the other day, knowing only too well my passion for both food and the biological sciences, particularly anatomy/physiology (the field in which I work). I have never been game enough to combine these two interests - I don't think my friends and family would like me for it if I did! - however a fine art student from Thailand, Kittiwat Unarrom clearly has more guts than me (heehee, had to throw that in) and bakes bread in the form of dismembered body parts.
"Inspired and informed by anatomy book and visits to forensic museums, he makes sure that none of your various body part bread desires go unfulfilled: he also makes feet, hands, and internal organs which come displayed impaled on hooks. Made from dough, raisins, cashew nuts, and chocolate, all of the works on display are totally edible."
Even if you're unlike me and anatomy isn't your thing, the level of detail in his work from such simple ingredients is just amazing. But what I really appreciate here is the combination of fine art, science and food. This gets a big gold star from me!

Tuesday 20 May 2008

Golden Groceries sells black soy bean noodles!

One of my all time favourite local shops is Golden Groceries. Whenever I find an unusual ingredient in a recipe I've found, these guys always have it. They stock every type of lentil, bean, grain and noodle you can possibly think of and the same goes for herbs and spices. They sell all manner of soy products, curry bases, frozen goods, snacks (Pocky for just $1 a box!) and a small selection of fresh herbs and vegetables, like kai lan, mustard, daikon, kaffir lime, birds eye chilis and all sorts of mushrooms. There is also a small but growing section of reasonably priced organic products (noodles, tea, snacks). But best of all is the owners are totally wonderful people. Whenever I shop there I always come out with a big smile on my face. They are always happy and welcoming, and they'll be able to explain to me what to do with the mysterious foods I'm buying.


One such mysterious food was black soy bean noodles. There was also white soy bean noodles, but why would you buy white noodles when you can have black ones?


So I boiled them up for about 10 minutes and it was great! You could use them for pasta too, as the taste was very pasta-ish. But for my first blay soy bean noodle experience, I chose to put them with a stir fry of garlic, ginger, chili, purple cabbage, red capsicum, green beans and mushrooms. I then stirred through 1/4 cup miso paste and 2 tbsp tamari soy sauce and mixed them in with the noodles. I took it to work for lunch in my lovely yellow Tupperware tub!


Monday 19 May 2008

Summer sassy apron - complete

It seems almost silly that I started making my apron for the Summer Sassy Apron Swap on Saturday, the coldest day Melbourne has had in 34 years. It was bucketing with rain so what better to do than sew an apron! Kitty pointed me in the right direction and I was finally inspired by this for my apron. I have to admit though, this is the most amount of pink I've ever used in anything I have ever made (and there isn't even that much pink on the apron!). Pink fabric, pink ric rac, pink buttons...! Nice and simple and summery. I hope my partner enjoys it!

I've finally completed it and it's off to America tomorrow morning (I doubt I'll make it to the post office by 5pm today!). I made matching a dishcloth out of the gingham-style fabric to go with it.


I've also decided to post my accompanying summery non-alcoholic drink recipe here, just because I think it's a really delicious drink and should be shared with everyone, not just my swap partner!

Cardinal Punch
60 ml cranberry juice
60 ml ginger ale
15 ml lemon juice
30 ml orange juice
lemon and orange slices for garnish

Half fill a glass with ice and add the fruit juices. Add the ginger ale and garnish with lemon and orange. YUM!

Sunday 18 May 2008

Make your baked beans more exciting

Here's a typical Sunday afternoon post-training lunch. So quick and easy whip up, healthy and really tasty. Those chilis you can see in there are our little homegrown ones and they certainly have a bit of punch!

Depending on what's in the kitchen, I will add any of the following, in any combination, to my baked beans:

- Garlic
- Onion
- Chili
- Broccoli
- Mushrooms
- Egg
- Spinach
- Cheese
- Corn
- Pumpkin chunks (precooked in the microwave)
- Capsicum
- Thyme or parsley
- Spices: cumin, coriander, paprika, fresh cracked pepper

I used the first six ingredients in the beans I made yesterday (those chilis are our own homegrown ones! Oh boy they have some punch), and served it with a thick slice of wholegrain toast. Delicious.


Wednesday 14 May 2008

Sassy Apron - Summer edition

I'm totally lacking inspiration here. I have some great summery fabrics that have been sitting in my stash for ages. I have a pattern - well I'm going to trace around one of my super comfy aprons that I own. But I am at a total loss as to where to go next. I have no idea what sort of layout I should do. I want it to have pockets because apron pockets are always useful, but what sort of pockets? Do I want to put any extra embellishments on, other than the ricrac I have to edge the apron with? I've been doing some little doodles in the margins of the research papers I've been reading while studying, but none of them have excited me so far. I really need to get this apron sewn this weekend so hopefully some wonderful, bubbly, summery idea comes soon!

Tuesday 13 May 2008

Whole orange muffins

What do you do with a fruit bowl full of oranges? I was feeling too poor to make a flourless orange cake (almond meal is so expensive!) and most other orange recipes I know only call for the rind of orange of the juice of one orange... not 5 oranges. So I decided to try making my own muffin recipe and the results were very pleasing! These were a winner! Makes 12 muffins.

5 oranges
60 g butter, melted
1/2 cup sugar
2 eggs
1 1/2 tsp ground ginger
2 1/2 cups self raising flour
Extra 3 tablespoons sugar
  • Preheat the oven to 180C (fan forced) or 200C for conventional oven. Grease the muffin pans.
  • Cut the oranges into quarters and peel the skin away. Chop the oranges coarsely and mash a bit with a fork. Place the oranges in a sieve to collect about 1/2 cup juice.
  • Combine the orange pulp, eggs, butter and sugar.
  • Combine the flour and ginger. Stir into the wet ingredients until just combined. Do not over mix!
  • Spoon the mixture into the muffin pans and bake for 15 minutes.
  • Meanwhile, heat the orange juice and remaining sugar in a saucepan, bring to the boil for 5 minutes until the mixture thickens. Set aside.
  • Remove muffins from the oven and allow to cool for 5-10 minutes. Place them on a wire rack to cool. As they are cooling, place a sheet of aluminium foil under the rack (for easy cleaning) and brush the top of the muffins with the orange syrup.


Taste Sensations! - Japanese snacks

I'm finally catching up and getting my photos sorted. A picture tells a thousand words, so this will be a pictorial post of some of the snacks we had in Japan. Most of the snacks we found were just so sickly sweet that we couldn't bring ourselves to buy them (I don't have a big sweet tooth - give me savoury!).


UFO 2 minute noodles - Japan's 2 minute noodles are simply far superior to Australia's!


Meiji Orange Chocolate - White chocolate with orange flavouring... yummo


Pokemon crispy things - We liked the cute packaging.

Green donut from Mister Donut - Can't remember exactly what's it is


Banana and cream crepes from AM-PM - A cheap and delicious but not so healthy breakfast.

Panda biscuits - These were cool. Chocolate on one side and biscuit on the other but both sides look like pandas!


Strawberries - The strawberries were just amazing in Japan. So amazingly sweet you'd almost think they were fake! We ate so many.


Soyjoy - an oxymoron?


Chocolate candy ball things (the packet down the bottom) - These looked suspiciously like my own little tablets...

Strawberry sponge cake - Kyoto was full of delicious cake shops. This came with a packet of dry ice to keep it cool on the way home. Perhaps a little overpackaged!

A little scone like thing that had ginger and some seed inside, with sugar sprinkled on top.

Birthday cakes - or is that birthday bread? I didn't understand these.

Fish type thing - I can't remember what these are called! But our Japanese friend, Erika, explained that these are a very old snack. They are something between a doughnut and cake, with different fillings (custard, red bean, chocolate) and taste delicious.

Choco pie - Perhaps a relative of Fresh Pie, but not anywhere near as good.

Tokyo banana - There were always massive queues for these so of course we had to try them. These are a bit of a gourmet treat of a little sponge cake filled with banana flavoured custard. Delicious! Erika was very excited we bought them.

Beer snacks - Dried squid, chili rice crackers and peanuts.

Fried sweet potato and ice cream - A not so appealing taste sensation.

Coke - The coke tasted like it came from a bottle! So much better than regular cans.

Blendy - Iced coffee. Bitter and milky, the way iced coffee should be.

1 litre Asahi - Why can't we get that here?!

Pocky - That does indeed say 'Brazilian Pudding' flavour (What is Brazilian pudding?). I also tried blueberry flavour but it wasn't nearly as good. Not photo worthy. New and improved pocky was in fact new and improved. Smaller pretzel with richer, smoother chocolate. Delicious.

Wednesday 7 May 2008

Fabric shopping in Tokyo

Fabric shopping in Tokyo was awesome! So much more variety than I've ever found in Australia.
I know there are some people out there who will be visiting Tokyo and want to do some fabric shopping, so I'll do what I can to help you with your very own Tokyo fabric finding adventures! I'll mention straight up that, unless you have a map, it's very hard to find the shops you're after so I'll do my best to include maps and detailed directions. Tokyo is filled with so many flashing lights, crazy alley ways and unstructured road layouts that it makes it a bit hard to just turn up to a particular place and just "wing it". I tried that and failed, but having said that, we had way more fun getting lost in Tokyo and stumbled across other interesting shops in the most bizarre places. I'll run through my adventuers in chronological order.

ABC Craft - Shinjuku
ABC Craft is in the 3rd basement level of Mitsukoshi department store next to Shinjuku station (see map). Mitsukoshi Department store is listed as Building 57 on the Shinjuku map in my Japan - Lonley Planet 2005 edition. It's quite similar to Lincraft in Australia. They sold a limited range of cute, cotton Japanese fabrics - there wasn't a massive fabric section but they had all of my favourite stuff: cute frogs, pandas, bunnies, retro fairy tale prints, strawberries, Echino prints etc. This was more of a craft store than a fabric store, so if you're more of a craft person then I'd suggest checking it out. Just next to ABC craft is also a big kitchen supplies section of the department store and they have some very cool aprons, oven mitts and general utensils. Apparently there is a bigger, 4 floor store in Osaka. Even though this map is in Japanese it's easy enough to follow. The red block is Mitsukoshi Department store, and B3F just means Basement 3.
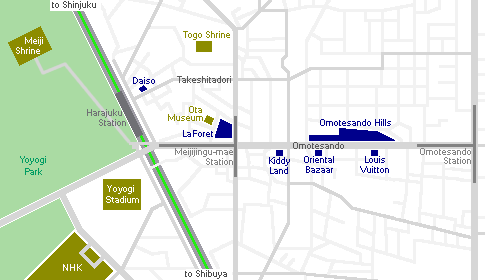


Daiso - Harajuku
This is Tokyo's largest 100 Yen Shop! It's 5 floors and you can pick up all sorts of crazy stuff so cheap. This isn't a fabric store, but I picked up some very cute hankies and little towels here (along with a heap of other stuff - little plates, bowls, shinkansen bandaids, fun sticky tapes etc). I spent ages here. A great place for buying little trinkets for friends too. It's just over the road from Harajuku station. This map is from Japan Guide. I've included the whole map because I recommend a visit to Kiddy Land while you're there.


Lucky Star - Meguro

It's about a 10 minute walk from Meguro station. A small shop but with quite a large range of quilting fabrics mostly, all sorts of prints from traditional to kids fabric. Lots of embellishments, motifs and cheap buttons too. Actually, this place was a highlight of my holiday - the couple who ran the store were so lovely and helpful even though we couldn't understand each other. They still used a cash register from 1917 -- and let us have a go! You'll see the fabrics out the front of the store. There's also a pottery place just up the road from this store where we picked up some great bowls.

I adapted this map from the Meguro Parasitological Museum map (I went there too - see earlier post. It was really cool!)


Okadaya fabric - Shinjuku

We stumbled across this place by accident while trying to look for shoes. It's literally across the road from Shinjuku station and has about 6 floors of all sorts of fabric. The bottom floor was where I did most of my shopping (cottons, linens and canvas) and picked up a stack of fabric that I had been thinking of buying on the internet for ages. I should mention that there are two stores: one on the corner of the lane (opposite the adult shop) and one down the lane (it has a bunch of fabric out the front). There are pictorial instructions on the Okadaya website, but here's my instructions to go with it:
  • Take the EAST Exit at JR Shinjuku station (Yamanote Line). Go up the stairs. You will find yourself in front of a taxi rank looking out over a road with buildings on the other side.
  • There is a lane (no cars) next to the Studio Alta screen. You should be able to see the Okadaya sign just behind it. Go down the lane. Okadaya Shop #1 about half way down the lane, opposite an adult shop. There will be beads, cottons etc on the bottom level.
  • Okadaya Shop #2 is just a few doors down from Shop #1, down the side lane. You will see lots of fabric out the front of the shop.

Although I never made it there, Shinjuku is also the home of Tokyu Hands, which I have heard many many good things about, so you might as well go there while you're at it!

I tried on two occasions to find Marunan in Shibuya which is near Shibuya crossing. We hunted for ages trying to find it but totally failed. As I quickly discovered, Shibuya crossing is massive, and there are heaps of little alley ways right near it. I probably needed a map, and probably was within about 10 metres of it on several occasions!

I was hoping to visit Kinkado next to Ikebukuro Station (I was staying right near there) but after finding Okadaya I was feeling entirely satisfied with my purchases and didn't end up going.

There were a list of other places I wanted to visit but either couldn't find them or ran out of time. I was very happy with all of my fabric - I had particular prints that I was after and found them - but when I travel to Tokyo next time (oh yes, there will be a next time) I'll still have more places to go!

Some useful links that I referred to that may help you for your own Tokyo fabric adventure are:
http://www.askingfortrouble.org/crafts/tokyo-shopping-guide/
http://retromummy.blogspot.com/2007/07/shops.html
http://floatingworld.typepad.com/floating_world_views/2007/05/fabric_shopping.html
http://www.tokyowithkids.com/discussions/messages/333/624.html?1140414614