It was Gib's mum's birthday recently, so I baked her a cake. She loves Babar, so it's a Babar themed cake. Decorated with just some ready-to-roll icing.
I modified this recipe and it was absolutely delicious. So I'm recording it here so I can make it the next time I have a gingery carrot cake craving:
A terrific tasting Carrot, Orange and Ginger cake! (dairy free)
2 ½ cups wholemeal flour 1 ¼ teaspoons baking powder 1 teaspoon baking soda 1 ½ teaspoons powdered ginger 1 teaspoon ground cinnamon ½ teaspoon ground nutmeg ⅛ teaspoon ground cloves 6 carrots, peeled and grated (about 3 cups) 1 ½ cups granulated sugar (I substituted for CSR Smart sugar) ½ cup packed light brown sugar (I used low GI cane sugar) 4 large eggs 1 tablespoon grated orange zest 1 cup vegetable oil safflower oil, or canola oil ½ cup orange juice ½ cup finely chopped glace ginger
Preheat oven to 180 C. Spray and line a 25cm round pan with parchment, with a 5cm collar.
2. Whisk together flour, baking powder, baking soda, ground ginger, cinnamon, nutmeg and cloves in large bowl; set aside.
3. In a food processor, combine granulated and brown sugars, eggs and the orange zest until frothy. Add oil gradually. Process until the mixture is light in color and well emulsified, about 20 seconds longer. Scrape the mixture into a medium bowl. Stir in the carrots, glace ginger, and the dry ingredients until incorporated and no streaks of flour remain.
4. Pour into the prepared pan and bake until a toothpick or skewer inserted into the center of the cake comes out clean, 35 to 40 minutes (took 60-70 mins for me), rotating the pan halfway through the baking time. Cool the cake to room temperature in the pan (for a denser cake) on a wire rack, about 2 hours.
I lie. It's not really a cake. It's a bunch of cookies glued together. And a word of warning for anyone else insane enough to attempt a leafy sea dragon cake: this project is not for the faint hearted. Many times I stopped and said to myself "Why the hell are you doing this, woman?!" and walked away shaking my head. It took several hours, and I nearly cried at one point.
I am not a pro cake maker, I've never attended any cake lessons. It all started when my mum made cool animal cakes for me as a child and I've carried on the tradition. So if there are any people out there thinking "oh, why did she do that/use that, there's a much better way!" you're probably right, but I don't know about it! I had fun anyway. Eventually.
Some background on Leafy Sea Dragons
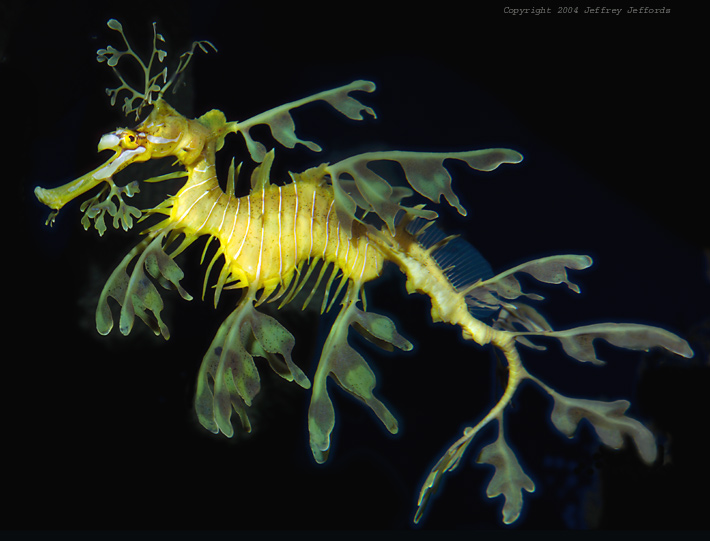
Phycodurus eques is related to the sea horse, and found in the southern and western oceans of Australia. We tend to get the Weedy Sea Dragon (Phyllopteryx taeniolatus) on the east coast which are much less elaborate than the leafy. The appendages aren't actually used for swimming, which is what I first thought when I started investigating, but have little fins along their back and head that they use for that. The leafy appendages are just for camouflage. They grow up to 30-40 cm. I highly recommend watching this video of them. They are stunning to see in action. I've only ever seen them in an aquarium in Western Australia.
Some background on how I decided to make my Leafy Sea Dragons
I had quite a few ideas for how to make it, given the constraints of making a leafy sea dragon: the legs and leg joints would be fragile so the head and body either needed to be light or the joints made strong (or both!). I thought about using meringue because it is both strong and light, but my attempts at meringue failed horribly but I'd had in my mind "cookies!" the whole time so I decided to go with that. Meringues also take a long time to cook, and I am an instant gratification woman, so cookies it was. I think gingerbread would work too, but I know many of my friends hate gingerbread.
I experimented with the royal icing you use for gingerbread houses, which is very strong and sets like cement, but at the same time is exceptionally messy and there isn't much room for mistakes. If you muck up, it's set like that forever. However, if you'd prefer to use "gingerbread house glue" then my recipe is:
Instead, for appendage glue, I decided to use white chocolate. It is strong but can be re-moulded. I used a good quality brand so it didn't go funny after heating and cooling.
I had made a small scale prototype the week before, using a variety of icings, cookie recipes and "glue". I went out for about half an hour, and Sylvester, our cat with strange food prefences, decided he wanted to have a taste. I came home to find the whole thing smashed on the floor and bits eaten. Another good lesson learned from my prototypes.
How to make a Leafy Sea Dragon
Ingredients:
For the structure:
1 quantity of cookie dough 1 block of good quality white chocolate Orchard ready-to-roll icing
For decoration: Yellow food dye Blue sour straps 1 block of good quality white chocolate Cream (for the ganache)
Method
I wanted to attempt to make my leafy 1:1 scale, so took this photo (inverted the colours to save on ink) and printed it A2 size (4 x A4 paper stuck together) and used it as a template for the cookies.
I cut out the head and body as one piece, and cut out each of the leafy appendages. I rolled out my cookie dough to 4mm thick, placed the template on the dough and traced around it with a knife. Most of the leafy appendages were baked for about 10-12 mins, but the body took 20 mins.
I rested the body in my potato masher, which placed on a small box to elevate it, because it was a convenient width to support the body vertically. I glued on the rear legs with a blob of white chocolate, then the middle legs.
I also stuck on some read to roll icing to fill out the cheeks, chest and body. The stark white is the icing, and the off-wihte stuff is the chocolate. You can see in the background the individual leafy cookies. I placed a shot glass under its body to help take some of the weight off the legs while it was drying. In the end I decided to keep the shot glass in there permanently because I didn't want the legs to break while I left him overnight. The glass under his nose is temporary.
The head actually snapped off at one point. One of those moments when you have a few heart palpitations. It actually worked out well because it meant I could attach the front legs more easily. The head I cemented back on with tooth picks, chocolate and icing.
I iced him all over with white chocolate ganache dyed yellow, starting from the rear and finishing with the head. I wanted to smooth him down more but I was terrified he would snap. I experimented with a few different icings in my prototype stages, but I love ganache so I rolled with that. I used blue sour straps for the details and his head piece nad whiskers. The eyes are just Orchard icing with a blue chocolate dot in the middle. I poke sour straps into the underneath of the body for the dangly, weedy bits.
I made sure to keep a washing basket over the top of the cake and to lock all doors to the kitchen to make sure Sylvester could not get his paws anywhere near the "cake". He's a rotter, that one. Every time he came into the kitchen while I was making the final version, he looked at me with adoring eyes, but I knew it was because he really wanted some chocolate covered cookies. He's cunning and mischeivous.
Then when Gib got home from work he told me that he was only joking when he said I should make him a leafy sea dragon cake. He said he didn't think I'd actually make it but thought it would be amusing to put the challenge to me. They do say pets take after their owners.
It's heading up to "birthday season" in our household and while doing some research for my next cake creation, I found this amazing sculpture of a centipede made from recycled bundt tins. The whole process is shown here. This is my kind of art!
Gib and I are both July babies and are having a combined birthday party. After the fish, axolotl, wasp cake and giant squid, I'm about to embark on my craziest, most ambitious cake ever. I'm a bit nervous. Gib has decided he wants a leafy sea dragon cake. Bloody hell! Any suggestions are welcome.
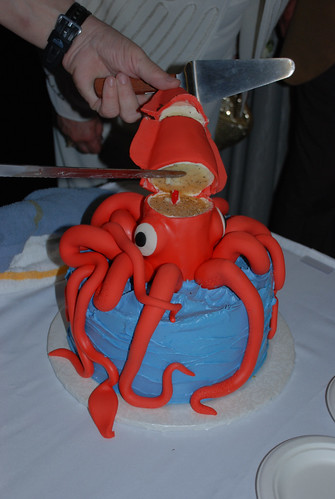
It's my friend's birthday coming up. The one who requested the axolotl cake. And she has requested a giant squid cake. She said she doesn't mind if it isn't 1:1 scale (I wasn't sure how I'd fit a 12 m long cake into my oven), so long as she can pretend that it's a giant squid. While doing some research, I did spot this seriously impressive squid cake:
That is a truly amazing cake. I hope I acquire skillz like one day that so I too can make such awesome cakes.
There is one stipulation on the squid cake: it is to be made with butter icing or similar (otherwise I'd happily use the mouldable icing the dude above used). Butter icing and I don't really get along. Butter icing and I have arguments and it gets messy, but I'm happy to work through our differences and one day perfect our relationship. I now have a new set of icing spatulas and piping tools, so hopefully that'll help the reconciliation process.
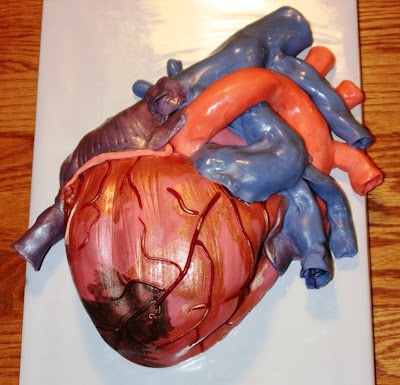
And while we are on the topic of cakes, you know how I just love anatomically correct art? Well there was a feature over at Cake Wrecks on organ-inspired cakes.
There was the brain, kidney and heart (complete with infarct!). It's reassuring that there are other people like me out there in the world that like these cakes!
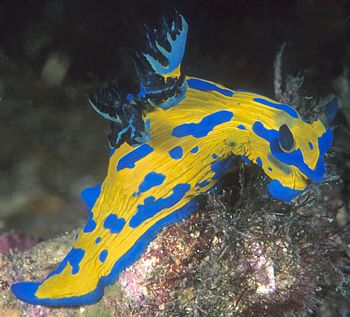
As I have mentioned before, my friends seem to be competing for the strangest marine animal birthday cake. Despite my decorating being quite hacked sometimes (I've finally decided to enroll in a cake decorating course), I always like a good challenge. I decided to make a Tambja verconis, which is found off the south-east coast of Australia.
I made this the day beforehand. Adapted from here.
200 g butter 215 g castor sugar 1 tbsp lime rind 2 eggs 2 cups self raising flour Juice of 2 limes 165ml can coconut milk
Preheat oven to 170°C. Grease an 11 x 21 cm loaf pan with non-stick baking paper. Remember to do this part because I was lazy and thought that greasing a tin would be enough, even though I've read ~100 times that you should always put non-stick baking paper on the bottom of the loaf pan. The bottom of the cake stuck to the tin. That was OK for me because I was turning the cake into a nudibranch, but if you're not, then you probably want to put baking paper in the bottom of your pan.
Beat butter, sugar and rind until pale and fluffy. Add eggs, one at a time, beating well after each addition.
Gently fold in flour, lime juice and coconut milk.
Bake for 50 mins until golden and cooked through. Leave for 5 mins before turning out on a rack to cool completely.
Swiss buttercream icing:
I decided to make a Swiss buttercream icing because it comes up very glossy, which is what you want when making a nudibranch. I really like Swiss buttercream because it isn't sickly sweet and is very easy to smooth over your cake. People will tell you lots of horror stories about making it, and having now made it a few times over the years, all you have to do is be patient. Keep beating and it will eventually whip up.
Four egg whites
220 g castor sugar
330 g butter at room temperature, cut into 10 pieces.
Blue and yellow food dye
Completely dissolve the castor sugar into the eggwhites in a bain-marie: a bowl over a saucepan of hot water (make sure the bottom of the bowl is not touching the water). Stir continuously. You will know when the sugar is fully dissolved when you can't feel any grittiness in the mixture.
Beat the eggwhite/sugar mixture until stiff peaks are formed. Beat in the butter one piece at a time. You'll probably only start to see it fluff up after the last or second last piece is added. It might look like it's starting to break down and go mushy, but don't worry, just keep whipping.
Separate your icing into two bowls, add blue or yellow dye to each, and whip until the colour is evenly blended through. I also like to set some plain icing aside in case I've miscalculated and need more. The yellow of this icing actually came out very bright: "Bart Simpson yellow"!
This icing can be kept for up to 3 days in the fridge in an airtight container. You will need to re-beat it after it's at room temperature.
Place the cake onto two sheets of overlapping baking paper (this helps keep your plate clean and makes it easier for tidying up). Carve the cake into the shape of a nudibranch. Round the edges, brush away any crumbs.
Cover the cake entirely in yellow icing. Remove the baking sheet.
Pipe a large amount of blue icing around the entire edge of the base of the cake cake and smooth it out so it joins the yellow, being carful not to blend the two, to make the edge of the foot of the nudibranch. Refer to this website for more nudibranch anatomy.
Pipe blue lines/dots along the mantle of the nudibranch.
To make the rhinophores (the "antennae" looking parts), I used chopped down jelly snakes. Place a toothpick into the end of the snake to keep the rhinophore somewhat upright, and insert the other end of the toothpick into the head of the cake.
To make the gills, I made some blobs of Orchard icing, coloured blue. I made 4 x 4cm lengths of blue jelly snakes. For each section, I cut four slits down into the snake, leaving about 1cm at the base. I inserted them into the blobs of icing and then mounted them onto the mantle of the nudibranch. I piped some of the blue buttercream icing around it and into the centre to keep it in place.
The ridge the protrudes across the top of the nudibranchs "forehead" is made out of a strip of Orchard icing
I am aware that nudibranchs have eyes that are very tiny and can barely be seen, however the nudibranch cake looked pretty ridiculous without them, so I gave it some big blue eyes anyway (artistic licence is ok!).
Sorry I'm a bit late in reporting this, but I was very excited to hear from a.s.h. who commented on my blog a little while ago to say that she'd made her very own axolotl cake! It looks terrific. You can see the final result here. I love sharing knowledge and ideas and hope that other people can learn from my successes and failures. It's one of the reasons why I started this blog, so to see things like this really makes me happy.
I love giving birthday cakes to my friends each year. It's fun for me and it means that my friends don't have to find space for more junk in their small living spaces. But as time goes on, my friends just seem to want aquatic animal cakes. And now it seems as though they're competing for the strangest aquatic animal cake. The fish cake was fun and easy, then there was the call for an axolotl cake, then an octopus cake and now... a nudibranch. I started wondering what on earth I have started (and what is wrong with my friends?!). I suggested to my friend that perhaps she would like star fish instead, but no, a nudibranch it is. I do love nudibranchs, they are totally stunning little creatures. However how on earth do I turn it into a cake?! The cake itself should be easy (a loaf cake of some sort should do)! But I suspect I'll be needing a lot of food dye. I've got about two weeks to work it out.
I've come down with the flu. I spent the day reading and sleeping (mostly sleeping) and now it's 2am and I'm wide awake. Needless to say I'm now regretting not getting my flu vaccination this year - I'd forgotten how horrid it is! So I thought I'd share some adventures I've had in the kitchen the past week.
Edit: Oops in a haze of flu, I forgot to add the bit about lyrebirds... see below! Recipe review #1: Beer baked beans
I finally gave the Stove-top sweet and spicy beer baked beans a go (as mentioned in a previous post). After making the recipe exactly as it said, I found it was far too sweet. I ended up adding 500 g chopped tomatoes to the pot as well to make it less sweet. I'd probably halve the amount of sugar and add a 400 g tin of tomatoes in future. I could not find navy beans, but great northern beans were the best substitution (they're virtually the same size and shape anyway). And I decided on Coopers, a nice strong beer taste. I've been taking it to work and getting some envious looks in the lunch room.
Recipe review #2: Maggie and Simon's mushroom and leek calzone
Calzone are delicious. Often I'll make up a batch of 6 for Gib and I to take to work during the week, or for a quick, filling meal after training. When I saw this recipe featured on the Cook and the Chef last week, I had to give it a go. Mushroom and leek a favourite food combination of mine, and I was intrigued to see how the non-pizza bread dough turned out. I made the dough in the food processor, and the dough was quicker and less messy to make than pizza dough is (which sped up the calzone making process substantially). I substituted the fontina for gouda. Oh boy, it was delicious. I'll definitely be making this one again.
Sarah's octopus cake Friday night I helped my friend Sarah bake a blue ring octopus cake for her friend who she goes scuba diving with every weekend. Sarah doesn't bake very often and we were a little pressed for time having to do it all in the one evening (usually I make my cakes in advance) so we decided to go with the classic packet chocolate cake and ice with butter cream icing. We discovered that Betty Crocker's chocolate cakes only make 8 cups, and the octopus cake is a 10 cup tin. The cake mix just filled the legs but not the base of the tin. It still worked out fine. The blue rings are made from candy necklaces and the eyes and beak (Sarah, like me, clearly also has an appreciation for anatomical correctness, even in cakes) are made from mini licorice all sorts. Congratulations to Sarah for her first ever character cake!
Chasing lyrebirds
I took the day off last Thursday to hang out with Gib to coordinate with his work hours, and I worked Saturday. We took a picnic lunch and headed for the Dandenongs. From Grant's picnic ground in Kalista we took the eastern loop (about 7km) and on the way spotted four lyrebirds! The first was a female just scurrying across the path and scratching about. We heard lyrebirds the whole way around though. We started picking their calls by thinking "Gee, that kookaburra sounds a little close to the ground" and then "Hmm.. that bell bird sounds a little flat, don't you think?". About half way around the track we spotted two males hanging out together (brothers?), practicing and strutting their stuff. Then another male came along and started up this massive repertoire, much more impressive (better mimicry). The three of them proceeded to have a bit of a sing off until the two boys scurried away. This is a poor quality video I took with my camera, but I took it for the sound. You can hear the more impressive male and see the other two scratching, strutting about and then finally scurrying away. The only bird you can hear on the video is the lyrebird, but my favourite is when he does the kookaburra. Exciting stuff. Lyrebirds can be very hard to spot so we were extremely fortunate to see not one but four of them!
Not much sewing and crafting been happening around here of late. There are some ideas happening, some sketches, but not much cutting of fabric, stitching up etc. Give me a week and I'll have some of that.
This morning I had a little bit of time on my hands so I decided to whip up a loaf of Rhubarb Nut Bread. Of course, because I simply can't help myself and because I couldn't be bothered going down to the shops to pick up the actual ingredients, I made some modifications to the recipe. The original recipe is for two loaves, so I halved the recipe to limit the amount of cake in the house (don't want to tempt any diabetics in the household!).
This cake proved to be exceptionally quick to make in terms of preparing the batter. The result was very pleasing: it's a moist cake with a rich honey flavour and the different textures of rhubarb and walnut work well together.
Beth's rhubarb and walnut loaf recipe
3/4 cup brown sugar 1/3 cup of vegetable oil 1 egg 1/2 cup soy milk 1 tsp lemon juice 1/2 teaspoon bicarbonate of soda 1/2 teaspoon vanilla extract 3/4 cup plain flour 1/2 cup wholemeal flour 3/4 cup diced frozen rhubarb, thawed, drained 1/4 cup walnuts 60 ml honey 1/2 teaspoon of cinnamon 1 tsp dairy-free margarine, melted
Preheat oven to 175ºC. Combine milk and lemon juice, set aside for 10 mins. In a food processor, combine brown sugar, oil and egg. Add the milk, bicarbonate of soda and vanilla to the mix, process until combined. Add the flour, one third at a time, until well combined. Stir through the rhubarb and walnuts. Pour mixture into a greased loaf pan. Combine the honey, cinnamon and margarine. Drizzle over the top of the cake mixture. Bake for 45-50 mins.
Yesterday was Gib's birthday so, at his request, I baked him a rhubarb cake in the new octopus cake tin. The octopus was very appropriate given that his birthday present was an introductory scuba diving course! He's always loved rockpools and marine life (his university major was in marine biology) and some of my best memories of us hanging out together was when we were teenagers, going camping down at Port Fairy and running along the rockpools, harassing star fish and watching elephant slugs chomp down on sea lettuce. He would turn over rocks looking for chiton, flatworms and crabs to show me. The octopus is his favourite animal though. While at Osaka aquarium I think we spent over two hours watching octopuses, mostly the giant pacific octopus, do their thing. If you want to know more about why octopus are so damn cool, I'd suggest Pharyngula as the place to learn more.
Making the cake:
To make the cake I followed this recipe but with some modifications to account for all of the dietary requirements of the family (diabetic and lactose free). Diabetics didn't eat the icing. Here is my version of the recipe: Buttermilk rhubarb bundt cake
2 cups plain flour
2 teaspoons baking soda
1 teaspoon allspice
1/2 cup CSR Smart sugar
1/2 cup dairy-free margarine (I used Olive Grove classic spread, the mild tasting one)
3 teaspoons lemon juice
2 cups reduced fat soy milk
2 large eggs, lightly beaten
3 teaspoons red food coloring (I wanted it really red on the inside!)
2 teaspoons vanilla essence
4 cups cut fresh rhubarb or frozen rhubarb, thawed, drained (although I forgot to thaw and drain mine and it worked out fine)
Preheat oven to 180°C. Coat bundt pan with spray oil.
Combine milk and lemon juice, set aside.
In mixing bowl add flour, allspice, baking soda, salt and sugar.
Add margarine and cut in so mixture resembles crumbs.
Combine eggs, food colouring and vanilla. Add to dry mix, along with milk, about 1/4 at a time until combined. Mix through rhubarb.
Spoon cake batter in the pan. (Note: I was quite concerned because the mixture was very runny, but I decided to trust the recipe and it worked out fine). Bake 55 minutes until top springs back with a touch and sides shrink away from pan. Cool ten minutes and invert onto cooling rack. Allow to cool completely.
Decorating: You will need:
Half a packet of Orchard icing
A candy necklace, for the suckers
A packet of mini licorice allsorts, for the eyes and rocks
A packet of fruit tingles, extra decoration
Raw sugar, for sand
Colour the orchard icing to whatever octopus colour you like. I aimed for red, but no matter how much dye I added it still turned out to be a rich pink colour (Gib doesn't mind!). Roll it out and drape it over the top of the octopus, pushing it and moulding it around to cover the legs. Using a sharp knife, cut off any extra icing.
Decorate with the rings from the candy necklace for the suckers. The eyes were attached with toothpicks. The base of the cake was brushed with honey and water mixture, and then sprinkled with raw sugar for sand. The star fish were moulded out of leftover Orchard icing.
Gib's mum just arrived back home today, after being in America for almost a month. Apart from bringing home lots of crazy stories, she also brought home this...
...for me! I couldn't believe it! Not only because it is just a totally amazing cake tin (it's a Nordic tin, like the castle tin), but because, unknown to Gib's mum, I was planning to make Gib an octopus cake for his birthday next week! I am so excited, I can't wait to try it out.
Gib's mum is so lovely. She's so patient and tolerant and calm (I guess living in a house with three males will do that to you). She always takes things - and people - as they come. I have a lot to learn from her.
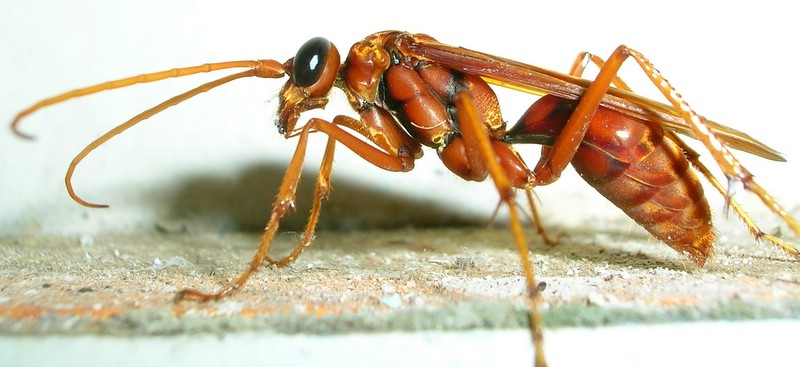
Well it is complete. I wasn't sure how it would turn out, but as with most things I make, I just started and just rolled with it. I should mention that this is simply a description of how I made the cake, and I'm certainly not saying that it's the best way or the quickest. I wanted to write down the process so I can learn from my cake making endeavours for the future, and if someone else can gain some inspiration on the way, then all the better. I really have no idea about cake making: I just think of something and try to make it using cake as my medium. How to make your very own Spider Hunting Wasp cake:
I made the cake (the innards) a few days ago. As I've mentioned before, if I'm making a character cake, I always like to make the cake in advance because it's so much easier to carve and work with and also means that I have time in case it doesn't work (my cakes have a habit of not working under pressure!). Because of the shape of the wasp, I decided to make the cake in two loaf tins. I made a lemon loaf cake based on these tworecipes. I like my lemon cakes to be really lemony, and this one is certainly lemony!
Beth's superzesty lemon cake
Makes 2 loaf cakes. Can be frozen.
250 g butter, at room temperature 2 cups sugar 1/3 cup grated lemon zest (6-8 large lemons) 1/2 cup lemon juice 4 eggs 400 g Greek-style yoghurt 3 cups self raising flour, sifted 1 tsp baking soda 1 tsp vanilla extract
Preheat oven to 180°C. Line base and sides of 2 x 7cm-deep, 10.5cm x 20.5cm (base) loaf pan with baking paper, allowing a 2cm overhang at both long ends.
Cream the butter, sugar and lemon zest with an electric mixer until light and fluffy. With the mixer on medium speed, add the eggs, 1 at a time.
Combine lemon juice, yoghurt, and vanilla in a separate bowl.
Add the flour, baking soda and yoghurt mixtures alternately to the batter, beginning and ending with the flour.
Divide the batter evenly between the pans, smooth the tops, and bake for 45 minutes to 1 hour, until a cake tester comes out clean.
To make the wasp:
For the body:
1 packet of Orchard icing
Food dye
1 packet of dark melting chocolate
1 Kinder Surprise or Easter egg (for the eyes)
Apricot jam
Prepare your mounting board if needed. I use a large wooden chopping board covered with gift wrapping foil.
Shape the cake and round any edges. You will need a head, thorax and abdomen. I made the head and thorax out of one loaf but cutting 1/3 of the end of the cake (for the head) and the rest for the thorax. I rounded the head and made the thorax pointed at one end. The second loaf was used for the abdomen. Mine ended looking up like so:
Using bamboo skewers, join the 3 body pieces together as below. I used two skewers to attach the head to the thorax, through the front of the head. I used one skewer to attach through the top of the abdomen through to the thorax.
Roll out the Orchard icing as per instructions. I chose to colour my wasp orange. Make strips for the segments on the abdomen.
Start with the abdomen. Brush the abdomen with apricot jam. Lay the strips of icing over the top of the cake and press gently so it attaches to the cake.
For the thorax, I rolled out a big square of icing, laid it over the top of the cake and with a sharp knife I cut it to shape. I rolled the icing back to apply the jam onto the cake, and then pressed the icing back into place.
For the head, I removed the cake head piece, rolled out circle of icing, brushed the cake with jam and wrapped the icing around it. I stuck the head back on.
For the wings:
1 x 500 g packet of air drying clay
Aluminium foil
500 g packet castor sugar
1/2 cup water
I should mention that this is the abridged version of how I made the wings. I spent a bit of time over the past week tinkering with different ideas, different moulds, but in the end I decided to make my own mould for the wings out of cheap, air drying clay that I picked up at my local craft shop. I made two wing moulds (wasps have two sets of wings). I then wrapped the clay moulds in aluminium foil and poured the toffee in. Because I only had one mould, I had to make the wings in two batches.
Lightly coat the aluminium covered moulds with spray oil.
In a saucepan (don't use a dark coloured saucepan!), heat 250 g sugar and 1/4 cup of water together. Leave it to bubble, without stirring, until it turns golden brown.
Quickly pour it into the prepared moulds. Leave to set on the bench for 30 mins.
Avoid getting water on your toffee or it will turn to liquid.
For the legs, antennae and eyes:
Melt your dark chocolate. I'm lazy and melt chocolate in the microwave.
Lay down a sheet of aluminium foil on the bench. Using a teaspoon and a skewer, spoon out chocolate onto the foil and smooth out to make the shape of a leg. Leave to set for a few minutes, then turn the leg over. Apply chocolate to the other side to give the leg more "body".
For the antenna, carefully draw a thin line of chocolate across the foil with the edge of the teaspoon. Build up the chocolate with a few extra layers if it's too fragile. It doesn't matter if it looks a bit blobby or rough: wasp antennae are moniliform!
I attached the legs to the body by literally shoving the edge of the leg straight into the cake.
I gently pried open the kinder surprise using a sharp knife, then wedged the halves into the side of the head. I then attached the antennae in the same fashion as I attached the legs.
Using a paintbrush, I made lines across the back of the plates of the abdomen with melted chocolate.
Mounting the wings:
This was a challenge that I hadn't really thought through when I started the whole project. In the end, I jammed the wings into the back of the head, which seemed to work fine. I needed to remove them for transportation though. I would probably do this right before the cake is to be presented, or alternatively make the wings thinner in future, because the weight was a bit too much for the head in the end, and it ended up partly caving in. It was able to be patched, but just a reminder for myself for the future.
This photo is just before I brushed down the icing sugar off his face. A post-icing-sugar-face photo to come!
My birthday is coming up fast, and as nontraditional as it is, I love making my own birthday cake. It's my present to myself, my opportunity to think up crazy ideas and try to turn them into a cake... sometimes my ideas are successful, sometimes not so successful. This year I'm going to attempt something a little more extreme, and many I know (like my mother) will say it's gross. Not quite as gross as the guy who makes body parts out of bread, but I guess the inspiration is kind of gory. This year I have decided to make a wasp cake. They are creatures that have evolved some of the most fascinating life cycles, they have beautiful bodies (I think so, anyway) and watching them in garden as I was growing up definitely fuelled my passion for gardening and the world of zoology (interestingly, Pip at Meet Me at Mikes had an interesting post along those lines the other day), so I've decided to honour them in cake form. And making a wasp into a cake is going to be a tough challenge - I love a good challenge!
Wasps aren't so gory, you say? Sure, they hang about during summer and you have to watch your soft drink, and they have a horrid sting, but they're not so bad. Wasps are amazing and gruesome parasites, and if you're at all queasy, I'd suggest stop reading now.
Why are wasps so damn cool? Here are some examples. There's Hymenopimecis whose larvae live on spiders. The larvae change the host spider's behaviour so it weaves a web in which the wasp larvae can hang their cocoons. And then they eat the spider.
There is the Emerald cockroach wasp, Ampulexcompressa, who has long been known to "mind control" its poor cockroach host. It eats the antennae off the cockroach then insert its spine into the ganglia (basically the brain) of the cockroach, semiparalise it, then guides the cockroach around like a horseman on a zombifiedhorse, using the cockroach's remaining antennae like a leash, back to the wasp's burrow. It then lays its eggs in the abdomen of the wasp.
Then there is the larvae of Glyptapanteles partially develop inside caterpillars, then manipulate the caterpillar into caring and tending to the larvae as they grow. The larvae partially eat the caterpillar, eating their way out of it, but still keep it alive. They form cocoons, and the (possessed) caterpillar continues to watch over the cocoons until the adult wasp hatches, and then the caterpillar dies. There many more tales of wasps doing amazing things to their hosts, and I would suggest to anyone who is interested in knowing more to read Carl Zimmer's brilliant book "Parasite Rex". This book will totally turn your ideas about the food chain on its head.
The cake
I intend to make the body out of either a log tin or a large rectangular cake cut in half. The plates of the abdomen will be made from Orchard soft icing. The legs can be made out of many things: licorice or other similar confectionery, soft icing etc. I'm not too fussed about that. The wings will be the challenge (and the part most appealing to me): I'm going to try to make them out of toffee glass poured into a purpose built "egg ring" in the shape of the wings... unless I can think of a simpler solution. I'll have to try that out before the day I make it.
I doubt whether there are any Australian mothers left out there who don't this cook book:
It's a classic in every household. Gib and I were housesitting for Gib's Aunt over the weekend and it was sitting on a little table next to the bed. I really should not have been surprised to find this book next to the bed as Gib's Aunt is one of the most amazing cake makers you'll ever meet. I had hoped that her amazing cake-baking skills would infuse into me during my time at the house, and it seems that that may have happened.
I had six passionfruit and two ripe bananas sitting in the fruit bowl and, lo and behold, on page 60 of the Women's Weekly Cakes and Slices cookbook there was in fact a recipe for Passionfruit and Banana cake that required five passionfruit and two ripe bananas. Here is the recipe, from Australian Women's Weekly (1991) "Cakes & Slices", p. 60
125 g butter
1 cup castor sugar
1 egg
2 mashed bananas (3/4 cup)
3/4 cup chopped walnuts
200 g passionfruit yoghurt (I substituted for 175 g natural yoghurt and the pulp from 3 passionfruits)
1 cup wholemeal self raising flour
1 cup plain self raising flour
Passionfruit icing
1 1/2 cups icing sugar
1 tsp soft butter
2 passionfruit
Grease a 20cm round cake tin, line base with paper. Grease paper. Cream butter and sugar in a small bowl with an electric beater until light and fluffy. Add egg until combined. Transfer to a large bowl. Stir through banana, walnuts, yoghurt, (passionfruit), then sifted flours. Spread mixture in to a prepared pan and bake in a moderate oven for 1 hour (although it took 1 1/4 hours). Stand for 5 mins before turning out. Top with icing when cake is cool.
For the icing: Sift icing sugar into a small bowl. Stir in butter and enough passionfruit to make a stiff paste (mine was a bit runny, I think. Oh well.)
Here are the results:
I reckon this was one of the best tasting cakes I've ever made. Moist, tangy and neither dense or fluffy. The icing was very sweet, but it was thin enough that it didn't bother me. Delicious.
I finally christened my new Nordic castle bundt cake tin. It was Gib's dad's birthday, but he has recently been diagnosed with diabetes, so I made a diabetic-friendly sponge cake with diabetic jelly. I wasn't sure how it would turn out, especially baking a sponge in a bundt tin, a tin that I've never used before, but it worked out fine! The sponge cake recipe was a new one I was trying out and it wasn't as great (it was definitely edible, and tasted good, but not great like my usual recipe).
250 g plain flour 20 g cocoa powder 2 tsp baking powder 120 g butter, softened 130 g raw sugar 2 large eggs 2 very large bananas (~500 g), mashed 60 g shredded coconut 80 g dark choc chips
Preheat oven to 175 C, fan forced Sift combined flour, cocoa and baking powder. Beat butter and sugar until light and fluffy. Add eggs one at a time, making sure each egg is combined before adding the next. Mix in banana. Fold in flour, then coconut and chocolate chips. Mix until well combined. Grease a loaf pan (22 x 12 cm) and line the base with baking paper. Spoon mix into the pan. Bake for 60-65 mins or until the insides are cooked.
As I mentioned previously I had to make an axolotl cake for my friend's birthday. She has a pet axolotl and is generally an avid axolotl fan, so of course wanted an axolotl cake. It was certainly an unusual request, but not an impossible one. The cake is a white chocolate mudcake with white chocolate butter cream frosting. Here are detailed instructions on how to make your own.
I always make my cakes at least a few days beforehand. Then, if your cake fails (as mine are prone to) you have time to make another. It also means you can refrigerate/freeze the cake which helps you to carve them into shapes.
Mudcakes are fine for sculpting into cake creatures and can be stored in the fridge. If you are freezing them, allow a day to thaw out in the fridge because they are very dense.
If you are making a butter cake or any other soft, less dense cake, then I strongly recommend freezing the cake. This can be done up to 2-3 weeks in advance. This doesn't affect the taste of the cake, but if you were concerned it did then I can assure you that your friends will be so amazed that you even made an axolotl cake they wont really care how it tastes. These thaw out fairly quickly, and you want the cake to be semi-frozen while you're carving it, so take it out of the freezer 1-2 hours before you want start carving it.
White chocolate mudcake (recipe from Cafe Cakes, Women's Weekly) 250 g butter, chopped 150 g white chocolate, coarsely chopped 2 cups/440 g castor sugar 1 cup milk 1 1/2 cups plain flour 1/2 cup self raising flour 1 tsp vanilla essence/1/2 tsp vanilla extract 2 eggs, lightly beaten
Grease a 20 cm round cake tin. Line with baking paper. Combine butter, chocolate, sugar and milk in a medium saucepan. Sitre over a low heat without boiling until smooth. Transfer to a large bowl and cool for 15 mins. Preheat oven to a medium-slow oven, 160 C fan forced. Whisk sifted flours into mixture. Stir in eggs and essence. Pour mixture into your prepared pan and bake for 1 hour. Cover the pan with foil and bake for a further 40 mins. I had some troubles with these baking times and after the 40 mins the cake was nowhere near cooked. I baked this for a further 20 mins covered, and another 25 mins uncovered. It still wasn't perfect then, but to be honest, when it came to eating the cake, no one really noticed or cared. It seemed like the cake tin they suggested was too small? Hope you have better luck with this than me!
White chocolate buttercream frosting 1/2 cup solid copha 1/2 cup butter at room temperature 40 g white chocolate, melted 1 teaspoon Vanilla Extract 500 g sifted icing sugar 3-4 tbsp milk Desired food colouring (I used red) Decoration Orchard icing Red food dye Sour straps Pink jelly snakes. The harder these are the better, so go for the cheapo brands. I used the snakes out of a packet of 'Dip Dunk chew' (I didn't end up using the smarties)
Make the cake Cream shortening and butter. Add the white and vanilla. Gradually add sugar, one cup at a time, beating well on medium speed, scraping down the sides of the bowl as required. When all sugar has been mixed in, icing will appear dry. Add milk and beat at medium speed until light and fluffy. Add food dye until you are happy with the colour.
Alternatively, if you're lazy like I am, you can put all of the ingredients into a food processor and blend on a medium speed until a fairly stiff but fluffy mixture forms. If you're not using the mixture immediately, store it in the fridge and then rebeat the mixture until it's fluffy again when required. This can be stored in an air tight container in the fridge for up to 2 weeks.
Carve the cake into shape Place your cake onto a chopping board and, using a sharp knife, cut out your cake into the shapes below Carve away the edges of the cake to create a nicely shaped body and head. Remembering that people have to eat this cake and have decent sized pieces, I kept the tail nice and thick, so it wasn't exactly anatomically correct (sorry!).
Transfer your cake to your prepared board. Place two slices of baking paper underneath the cake. After you have iced the cake you will slide these out (you wont messy up your board that way). Attach the head of the axolotl to the body using a bamboo skewer.
Ice your cake Smother your cake all over with icing using a metal spatula. For finer areas, like the inner curve of the tail, I use a butter knife. Smooth out most of the creases in the icing using a metal knife or spatula dipped into very hot water. You will set the icing and repeat this later, so just get the worst of the creases out now.
Add the legs and dorsal fin Make the legs by adding a bit of food colouring to your Orchard icing and kneed it through until the colour is uniform. Pull off a clump and roll into a sausage. Flatten one end slightly between your thumb and forefinger and then make 3 cuts to make the toes. Press to the side of the body.
Lightly dust your clean, dry work surface with icing sugar. Roll out a strip of Orchard icing so its 3-4mm thickness and 3cm wide (you will need to work out the length depending on your own cake, but mine was from the top of the head to the middle of the tail). Arrange the dorsal fin along the length of the axolotl.
The gills Take your 'snakes' and cut them 4-5cm long sections. You will need 6 in total. Make slit down one end. With your sour straps, cut them into 6 x 3cm sqares. Cut 10 slits down the sides of each square to make the furry gill segments - do not cut right the way to the middle! Slip the sour strap into the slot in the snake and trim the sour strap "gills" so the top bits are shorter (see diagram). Squeeze closed. The stickiness of the snakes should keep the sour strap gills in place. Poke them into the head. I didn't have any trouble with them staying in place but if you do I would suggest poking a tooth pick into the "snake" and then poking that into the head.
The eyes Roll a small amount of the Orchard icing into a ball. Flatten slightly. I used a coriander seed (oh yes!) for the pupil because it was the only thing I could find in the cupboard. But you could use mini m&ms or those little silver ball things or whatever else you find in your cupboard.
Finishing off: Leave the cake in the fridge for about an hour or so to allow the icing to set. Run a hot knife (a metal knife or spatula dunked in hot water) to smooth over your axolotl's icing. Mop up any messy bits on your display tray with a paper towel -- or ear bud for fine parts!
Thanks for dropping in!
A little about me: I'm at the tail end of my PhD, so as an escape from all the science stuff, I like to sew, cook and muck about in the garden. I'm always finding and doing things and forgetting how I got there, so my little blog space is all about noting down my ideas, inspirations, successes and failures to help me remember - and maybe they'll be helpful to you too!
I live in the suburbs of Melbourne with my partner, Gib, two cats, three chickens and two mischievous pet rats. Occasionally I'll blog about them and my other passion: karate.
I love suggestions, questions and comments, so please don't be shy! Thanks for dropping by!
What's with the goat? Goats aren't sheep: they are willful, independent and love getting out and doing their own thing. They like to consume anything - food, shrubbery and even fabric. Much like me, really (although in more of a metaphorical sense).
Why is the goat in a coat? Not sure. It just rhymed.






.jpg)




.jpg)


.jpg)


