Showing posts with label How-to. Show all posts

Sunday, 19 July 2009

How to make a leafy sea dragon cake

I lie. It's not really a cake. It's a bunch of cookies glued together. And a word of warning for anyone else insane enough to attempt a leafy sea dragon cake: this project is not for the faint hearted. Many times I stopped and said to myself "Why the hell are you doing this, woman?!" and walked away shaking my head. It took several hours, and I nearly cried at one point.

I am not a pro cake maker, I've never attended any cake lessons. It all started when my mum made cool animal cakes for me as a child and I've carried on the tradition. So if there are any people out there thinking "oh, why did she do that/use that, there's a much better way!" you're probably right, but I don't know about it! I had fun anyway. Eventually.

Some background on Leafy Sea Dragons

Phycodurus eques is related to the sea horse, and found in the southern and western oceans of Australia. We tend to get the Weedy Sea Dragon (Phyllopteryx taeniolatus) on the east coast which are much less elaborate than the leafy. The appendages aren't actually used for swimming, which is what I first thought when I started investigating, but have little fins along their back and head that they use for that. The leafy appendages are just for camouflage. They grow up to 30-40 cm. I highly recommend watching this video of them. They are stunning to see in action. I've only ever seen them in an aquarium in Western Australia.


Some background on how I decided to make my Leafy Sea Dragons

I had quite a few ideas for how to make it, given the constraints of making a leafy sea dragon: the legs and leg joints would be fragile so the head and body either needed to be light or the joints made strong (or both!). I thought about using meringue because it is both strong and light, but my attempts at meringue failed horribly but I'd had in my mind "cookies!" the whole time so I decided to go with that. Meringues also take a long time to cook, and I am an instant gratification woman, so cookies it was. I think gingerbread would work too, but I know many of my friends hate gingerbread.

I experimented with the royal icing you use for gingerbread houses, which is very strong and sets like cement, but at the same time is exceptionally messy and there isn't much room for mistakes. If you muck up, it's set like that forever. However, if you'd prefer to use "gingerbread house glue" then my recipe is:

3 egg whites
1 1/2 teaspoons cream of tartar
3 - 3 1/2 cups icing sugar

Instead, for appendage glue, I decided to use white chocolate. It is strong but can be re-moulded. I used a good quality brand so it didn't go funny after heating and cooling.

I had made a small scale prototype the week before, using a variety of icings, cookie recipes and "glue". I went out for about half an hour, and Sylvester, our cat with strange food prefences, decided he wanted to have a taste. I came home to find the whole thing smashed on the floor and bits eaten. Another good lesson learned from my prototypes.

How to make a Leafy Sea Dragon

Ingredients:

For the structure:

1 quantity of cookie dough
1 block of good quality white chocolate
Orchard ready-to-roll icing

For decoration:
Yellow food dye
Blue sour straps
1 block of good quality white chocolate
Cream (for the ganache)

Method

I wanted to attempt to make my leafy 1:1 scale, so took this photo (inverted the colours to save on ink) and printed it A2 size (4 x A4 paper stuck together) and used it as a template for the cookies.


I cut out the head and body as one piece, and cut out each of the leafy appendages. I rolled out my cookie dough to 4mm thick, placed the template on the dough and traced around it with a knife. Most of the leafy appendages were baked for about 10-12 mins, but the body took 20 mins.

I rested the body in my potato masher, which placed on a small box to elevate it, because it was a convenient width to support the body vertically. I glued on the rear legs with a blob of white chocolate, then the middle legs.
I also stuck on some read to roll icing to fill out the cheeks, chest and body. The stark white is the icing, and the off-wihte stuff is the chocolate. You can see in the background the individual leafy cookies. I placed a shot glass under its body to help take some of the weight off the legs while it was drying. In the end I decided to keep the shot glass in there permanently because I didn't want the legs to break while I left him overnight. The glass under his nose is temporary.

The head actually snapped off at one point. One of those moments when you have a few heart palpitations. It actually worked out well because it meant I could attach the front legs more easily. The head I cemented back on with tooth picks, chocolate and icing.

I iced him all over with white chocolate ganache dyed yellow, starting from the rear and finishing with the head. I wanted to smooth him down more but I was terrified he would snap. I experimented with a few different icings in my prototype stages, but I love ganache so I rolled with that. I used blue sour straps for the details and his head piece nad whiskers. The eyes are just Orchard icing with a blue chocolate dot in the middle. I poke sour straps into the underneath of the body for the dangly, weedy bits.

I made sure to keep a washing basket over the top of the cake and to lock all doors to the kitchen to make sure Sylvester could not get his paws anywhere near the "cake". He's a rotter, that one. Every time he came into the kitchen while I was making the final version, he looked at me with adoring eyes, but I knew it was because he really wanted some chocolate covered cookies. He's cunning and mischeivous.

Then when Gib got home from work he told me that he was only joking when he said I should make him a leafy sea dragon cake. He said he didn't think I'd actually make it but thought it would be amusing to put the challenge to me. They do say pets take after their owners.

Here's the finished product:


Sunday, 8 February 2009

How to make a Giant Squid cake

Yesterday was the hottest day in Melbourne on record: 46.4°C. We have massive bushfires raging throughout the state. Needless to say things have been a little stressful* in these parts. It also means it's not the best weather for making a birthday cake. However, I headed to my parents' place where they have air conditioning in the kitchen and a spare fridge out the back. I started nice and early in the morning, so it was all done before the worst of the heat kicked in.

The specifications:
  • Make a giant squid cake. I couldn't do a 1:1 scale giant squid, and I wasn't sure how people would know it's a giant squid if it was cake-sized, because it would just look like a regular squid then. So I went with some sort of giant squid reference point: a boat.
  • The cake should be a white chocolate cake. That didn't happen. I ran out of time, and the day that I was able to make the cake was way too hot and it was going to be really nasty for the oven to be on for that long (1.5+ hours cooking time). So a vanilla cake it was (only 40 min cooking time). Sorry Sarah!
  • Must be iced with butter icing (my friend dislikes the sugary soft, mouldable icing). Butter icing, in 46.4°C weather, was going to be far too unstable. So I went with white chocolate ganache, in the hope that that would be more stable and would make up for the lack of white chocolate cake.

How to make a giant squid cake


You will need:
  • Double quantity of vanilla butter cake batter (I doubled the vanilla so it was more vanillary)
  • 1 large loaf pan (23 x 13 x 8 cm)
  • 1 slab pan (25 x 25 x 4 cm)
  • 750 g white chocolate
  • 250 ml cream
  • Plastic ice cream container lid, cut into 2 triangles for fins
  • Red & blue food dye
  • Candy necklaces (I got a massive bag for $2 at the Reject shop)
  • Toy boat
  • Toothpicks
Baking the cakes:

A few days before you need the cake is a good time to bake them.
  • Transfer ¾ of the double quantity of cake mixture to the loaf pan, and ¼ to the slab pan. Make sure your pans are well greased and have a layer of greaseproof paper on the bottom. Bake the slab for 30 mins, and the loaf for 40-45 mins.
  • Transfer to a wire rack and allow to cool completely. Freeze the cakes. (I do this even when it isn't hot weather, so it makes the cake easier to cut, and it crumbs far less).
Shaping the cake:
  • Allow the cakes to thaw slightly before carving.
  • Using a sharp knife, shape the loaf cake into the shape of a squid's mantle. I used this squid anatomy site as a reference. I wont feature the pictures here because they're kind of gross. Because it's a cake and we need to maximise the amount of cake to be consumed, mine is somewhat more squat than an actual squid. Refer to the shape below. I also made a slight ridge (0.5cm) where the mantle finishes and the eye section begins.

  • From the slab cake, cut the arms and tentacles by making wiggly strips from the cake. Cut 8 arms and two tentacles. Each arm is about 3 cm wide and 18 cm long (although I then later cut some shorter to fit on the cake board). Each tentacle is 25 cm long and 3 cm wide. I cut the two tentacles from the bottom 6 cm of the slab. The tentacles have a little diamond shaped bit at the bottom. Be careful with your arms and tentacles. If you break on don't fret. Use some icing and toothpicks to glue them back together.

My wiggly squid arms and tentacles. You can see that some of the legs have been cut shorter to fit on the cake board.


Make the ganache:

Melt together 700 g white chocolate and 250 ml cream over a double boiler. Set aside the spare 50 g white chocolate (don't eat it!). Stir through 5 ml red food dye and 1 drop of blue food dye. Beat together until blended, allow to cool to room temperature.

Assemble the cake:
  • Prepare the cake board. I used a wooden chopping board covered in a couple of layers of blue plastic.
  • Place the mantle in a back corner of the cake.
  • Arrange the bottom legs around the cake, below the ridge of the mantle, and use toothpicks to hold them in place. I had 7 legs/tentacles below, and 3 on top. Don't bother with the top ones until later.
  • Ice the cake with the ganache.

The toothpicks poking out there are just place holders for the top legs
  • Add the plastic fins. Ice them too. I saved the fins until a bit later so I could ice the sides of the cake better.


  • I used two white chocolate buttons and placed them in the centre of the bottom end of the mantle/head area, for a beak.
  • Place the boat at the end of the cake board. Drape the top legs over the top of the boat, and use toothpicks to insert the legs into the body, and carefully ice them too.

Beak and positioning of legs against the body. You can see it was getting a little messy in there! It's ok, ganache cleans up really well.

  • Put the squid in the fridge for a bit to set the ganache. Once firm, take it out and wtih a spatular or knife dipped in hot water (be sure to wipe off the water) smooth over the icing.
  • Add your candy necklace suckers along the sides of the arms and tentacles.


The eye:

This was a bit of serendipity. I didn't have any Orchard icing to mould into an eye and refused to go out into the heat. My mum had these small glass spice bowls. Originally I was going to use them as a chocolate mould (with the leftover 50 g white chocolate): fill the bottom with a centre of white chocolate dyed black, let it set, then fill in white chocolate over the top, then tip it out once its all set together. However, they didn't tip out. So I then decided to just keep the chocolate eyes in the spice bowl, and use the whole think as the eye. It really got that freaky eye lens thing going that squids have. I just pushed the eye/glass spice bowl into the side of the head.

The clean up and presentation:

Using a damp paper towel and some ear buds, carfully clean up around the cake board and tidy up any icing that has oozed into weird corners. And here it is...


Happy birthday, Sarah!

And, because I am lazy, this is also going to come under this week's Eye Spy something delicious theme, because, you know, white chocolate ganache is freaking delicious. This week's theme was suggested by the super crafty Handmaiden and hosted by the wonderful Cindy!

* My aunt lives in Whittlesea, one of the townships south of Kinglake where the worst has been that is assisting with feeding people and providing temporary shelter. We have friends who lives in Wallan and they managed to rescue their horses, fire came to within 3 metres of their house, but their house was been saved.

Tuesday, 25 November 2008

People who know how to make freaking awesome pie dough

I don't make or even eat pies very often (they're a little rich for me and I need to keep a bottle of Mylanta handy afterwards!), but when do, I want the dough to be freaking awesome. I am usually inspired to bake a pie when there is a large gathering and I need to bring a plate, so basically when I'm out to impress. But there's a definitely a knack and the books make it sound so easy. Like sponge cake recipes. And I've made plenty of crap pies while trying to impress!

I've found two great tutorials for making pie dough though: one that uses a mixer, and the other that swears by hand mixing.

  • Smitten Kitchen, one of my all time favourite food bloggers, recently posted a follow up post on how to make really flakey pie dough. The original, easy to follow, fool proof pie crust tutorial can be found here. I have to say, I'm completely with her on the no-shortening thing (I hate the taste and texture). The combined tips and explanations from both of these bloggers has helped my confidence immensely when it comes to pie making.

I know there are probably a gazillion more posts out there on how to get the perfect pastry, but these two have given me the most help and inspiration, and have yielded the best results, so I haven't bothered to look further. Having said that, if you've got any tips to share I'd love to hear them! I love having little collections of ideas on a topic!


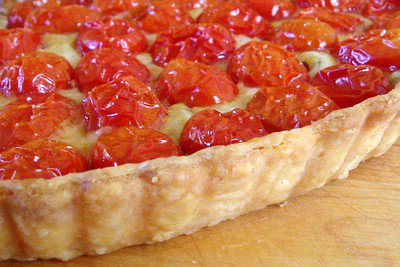
Tomato and onion tart by Beyond Salmon

Saturday, 1 November 2008

Christmas present production line... student style!

Gib and I have just finished updating our budget and we've realised that Christmas is going to have to be a little more organised. It's so easy to get excited and buy buy buy - not that we've gone to excess in previous years, but we took a good look and realised just how much Christmas costs. It's quite shocking really. Moreso now that my income has been halved. So this year I'm taking full advantage of the fact that my relatives think that it's cute and endearing that I make handmade gifts for them and also means I use up some of my stash which doesn't quite fit in its allotted location right now.

Getting organised for Christmas sewing

It does take a little more organisation and planning. I have to block out sections of my diary and make "meetings" with myself in the evenings and weekends so I can tell people that I'm busy and can't make it -- so I can sew. (I should probably do that for the gym as well...!)

You can see on the right my list of things I intend to get done. The part I really hate about sewing is the cutting out all of the bits: Cutting out the pattern, pinning the pattern, cutting out the fabric... it's a drainer. So I've decided to get all of the cutting done at once. It means I only need to get out my fabrics once, and then I just pop all of the fabric bits into separate project bags to sew them at my leisure. It also makes me more motivated to finish them if they're all ready to go. I like quick, easy projects that are functional and look good (hopefully) such as:

My slowly growing pile of cut-out bits and pieces


How to propagate your own herbs:


Everyone loves herbs. In the words of Gib's mother: "Herbs are great. You give them to people, they use them and then they kill them and then they love it when you give them more". I've started this now little project now so they are nicely established by Christmas time.

Herb propagation is really very easy. The word "herb" is just another word for "useful weed" in my books, and as such they sprout and grow easily. I take cuttings, about 7-10 cm long from the side branches of herbs. I'm using rosemary, thyme, oregano and sage. Pull off the leaves till about half of the bottom of the stem is bare. Pop them into a little glass of water on the windowsill and wait til roots start to strike, which takes a week or so. I put them into water as I've found they are more likely to get fungal problems and die if they are put straight into soil*. I'm also less likely to forget to water them if they are on the kitchen window sill. The only thing to make sure of is that there is water in the glasses at all times: even a few hours without water can be dire. After the roots have struck, put them into soil and remember to water them regularly. If you decide to put the cuttings straight into soil, remember to keep them well watered. Don't get fussed if some of them die - it's OK. I've come to realise a success rate of about 60-70% is quite good.

We bought a pot of oregano and thyme for $3 each at Bunnings, and will have about 10 cuttings from each. The sage and rosemary were already in my parents' herb garden. This makes for super cheaps presents that will be well received, if your Christmas budget is a little tight this year...

Sage and rosemary growing on the kitchen window sill, in ex-vegemite jars/glasses

* Having said that, I've also noticed that rosemary, thyme and mint tend not to be so vulnerable to fungal infections and can be put straight into soil. It seems to be the less-woody herbs, like basil or sage, that are more susceptible.

Friday, 31 October 2008

A healthy halloween treat

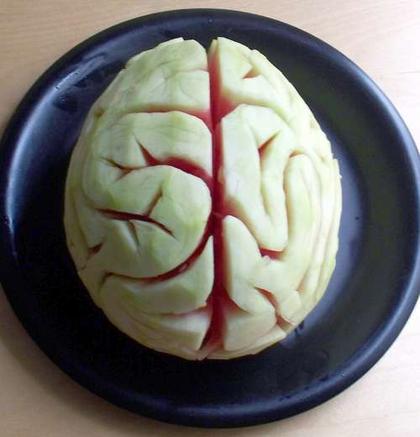
I was linked this from a friend the other day and thought it was pretty cool in a gory kind of way. A very inventive use for a watermelon. There are instructions for how to make it on BoingBoing.

Friday, 24 October 2008

How to make a nudibranch cake

As I have mentioned before, my friends seem to be competing for the strangest marine animal birthday cake. Despite my decorating being quite hacked sometimes (I've finally decided to enroll in a cake decorating course), I always like a good challenge. I decided to make a Tambja verconis, which is found off the south-east coast of Australia.


Beth's coconut lime loaf cake


I made this the day beforehand. Adapted from here.

200 g butter
215 g castor sugar
1 tbsp lime rind
2 eggs
2 cups self raising flour
Juice of 2 limes
165ml can coconut milk
  • Preheat oven to 170°C. Grease an 11 x 21 cm loaf pan with non-stick baking paper. Remember to do this part because I was lazy and thought that greasing a tin would be enough, even though I've read ~100 times that you should always put non-stick baking paper on the bottom of the loaf pan. The bottom of the cake stuck to the tin. That was OK for me because I was turning the cake into a nudibranch, but if you're not, then you probably want to put baking paper in the bottom of your pan.
  • Beat butter, sugar and rind until pale and fluffy. Add eggs, one at a time, beating well after each addition.
  • Gently fold in flour, lime juice and coconut milk.
  • Bake for 50 mins until golden and cooked through. Leave for 5 mins before turning out on a rack to cool completely.
Swiss buttercream icing:

I decided to make a Swiss buttercream icing because it comes up very glossy, which is what you want when making a nudibranch. I really like Swiss buttercream because it isn't sickly sweet and is very easy to smooth over your cake. People will tell you lots of horror stories about making it, and having now made it a few times over the years, all you have to do is be patient. Keep beating and it will eventually whip up.
  • Four egg whites
  • 220 g castor sugar
  • 330 g butter at room temperature, cut into 10 pieces.
  • Blue and yellow food dye
Completely dissolve the castor sugar into the eggwhites in a bain-marie: a bowl over a saucepan of hot water (make sure the bottom of the bowl is not touching the water). Stir continuously. You will know when the sugar is fully dissolved when you can't feel any grittiness in the mixture.

Beat the eggwhite/sugar mixture until stiff peaks are formed. Beat in the butter one piece at a time. You'll probably only start to see it fluff up after the last or second last piece is added. It might look like it's starting to break down and go mushy, but don't worry, just keep whipping.

Separate your icing into two bowls, add blue or yellow dye to each, and whip until the colour is evenly blended through. I also like to set some plain icing aside in case I've miscalculated and need more. The yellow of this icing actually came out very bright: "Bart Simpson yellow"!

This icing can be kept for up to 3 days in the fridge in an airtight container. You will need to re-beat it after it's at room temperature.


Place the cake onto two sheets of overlapping baking paper (this helps keep your plate clean and makes it easier for tidying up). Carve the cake into the shape of a nudibranch. Round the edges, brush away any crumbs.


  • Cover the cake entirely in yellow icing. Remove the baking sheet.
  • Pipe a large amount of blue icing around the entire edge of the base of the cake cake and smooth it out so it joins the yellow, being carful not to blend the two, to make the edge of the foot of the nudibranch. Refer to this website for more nudibranch anatomy.
  • Pipe blue lines/dots along the mantle of the nudibranch.
  • To make the rhinophores (the "antennae" looking parts), I used chopped down jelly snakes. Place a toothpick into the end of the snake to keep the rhinophore somewhat upright, and insert the other end of the toothpick into the head of the cake.
  • To make the gills, I made some blobs of Orchard icing, coloured blue. I made 4 x 4cm lengths of blue jelly snakes. For each section, I cut four slits down into the snake, leaving about 1cm at the base. I inserted them into the blobs of icing and then mounted them onto the mantle of the nudibranch. I piped some of the blue buttercream icing around it and into the centre to keep it in place.

  • The ridge the protrudes across the top of the nudibranchs "forehead" is made out of a strip of Orchard icing
  • I am aware that nudibranchs have eyes that are very tiny and can barely be seen, however the nudibranch cake looked pretty ridiculous without them, so I gave it some big blue eyes anyway (artistic licence is ok!).


Thursday, 21 August 2008

Keeping the door open

At work they have this thing about turning the air con right up. I often find myself sitting at my desk in a tshirt when it's about 12°C outside, which I can't really complain about (although I do think that their energy consumption is excessive, and especially since the institute I work for is trying to "stay green", but that's another story). But the real "problem" is that the air blows so hard that my door closes. It makes me look entirely anti social, like I enjoy sitting in a stark white office with no windows and fluoro lights and want to be left to read research papers all day without distraction.

So I've decided to make a door stop. It will not only brighten my office but will also create an inflow of sociability and welcome distraction into my dull space (times when I have wedged my recycling paper bin in front of the door have shown this!).

There's a nifty pattern in Lotta Jansdotter's Simple Sewing book, which looks ace, but I think it might be a little big. I could scale the pattern down though.


Photo from supergail - isn't that fabric adorable?!

I have also just found this tutorial for a cute little pyramid shaped door stop. It's a little smaller and I like the shape, but I could go either way. Both seem like excellent projects to start using some of my stashed fabrics on. Tonight I finally have a night off to myself and I hope to spend it practicing some printing and sewing.


Pyramid door stop by all it took was one stitch


Update!

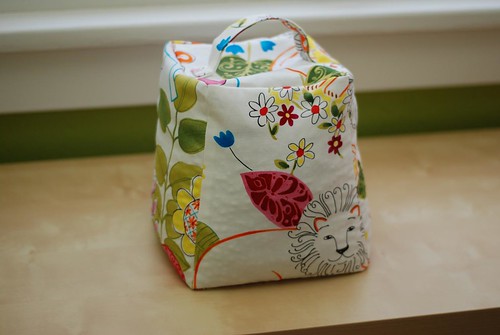
So this evening I did actually get time to do some sewing. I decided to go with Lotta's pattern, but I reduced the size by one third and the whole project took me about 2 hours to make (adjusting/making the pattern, sewing and finishing). I chose the fabric to match the blue/green colour of the carpet in my office. Unfortunately the lighting all around here is terrible, but hopefully I'll be able to get an "action shot" at work.


Monday, 14 July 2008

Easy peasy pants

I once taught Gib to make a pair of pants for himself, about 7 years ago when we were friends but long before we were going out. It was for some fancy dress party we were going to (he was being a pirate, I think). His pants then were made in exactly the same way I'm going to describe below. And it was in fact a guy who taught me how to make pants this way! More on guys and sewing here.

A bit crinkled -- I found them scrunched up in the top of the wardrobe! Can't believe they're still around!

Now times have changed and I'm the one making him a pair pants (coincidentally, these ones are blue and orange too!). They're bumming-around-the-house pants, so he can be comfortable while playing computer games, helping out in the kitchen (!!!) or while we're doing a bit of lounge room karate training. I picked up this awesome flannelette robot fabric when I absorbed a family friend's fabric stash. I am quite a lazy sewer so I like it when things don't have to be exact for them to work well, and these pants are perfect for hack sewers like myself.

How to make yourself a pair of comfy bumming-around-the-house pants in ~2 hours:


  • Take a pair of baggy pants. Turn them inside-out and fold them in half. Pull out the crotch so it sits flat.
  • Take your fabric, fold it in half. Lay your pants on the fold.
  • Cut around the pants, making sure you allow an extra 6 cm at the top for the waist and 6cm at the bottom for the hem. Follow closely to the inside leg, making sure you leave about 1cm for seam allowance (see pink line below). Be careful not to cut your pants too!
  • Cut the second leg out by tracing around the first leg you cut out, so that they are exactly the same.
  • Sew up the inside of the pant leg, from the point of the crotch to the bottom of the pant leg (see pink line -- sorry it's a bit dodgy!).
  • Pin and sew the crotch: This bit can be a bit confusing for me because my spatial skills arne't great. To help me visualise how I need to pin them, I turn the pant legs right side out. Take two corners from the top of each of the legs and pin them together. Continue to pin the pant legs along the U-shaped edge of the crotch to the back. When you are done you should have what looks like a pair of pants in front of you, with the seam of the pants on the inside (I have pinned and sewn them the wrong way so many times!). Turn the pants inside out again, for ease of sewing. Sew along the pinned crotch.
  • Make the waistband: fold the top of the pants down by 6 cm, and then tuck the edge of the waistband under again by 2cm. This means your waistband will be 4cm wide with 2cm tucked under so the raw edge won't be exposed. Iron and pin down. Sew along the pinned edge of the waistband, leaving a small gap (about an inch) through which you will insert the elastic. Top stitch around the top edge of your waistband: this help prevent the elastic in the waistband from rolling over while you're wearing the pants.
  • If you are adding back pockets, sew them onto the pants now. Take a piece of polar fleece, approximately 10 x 12 cm. Hem the top edge. Turn the remaining pocket edges under by 1 cm, pin down onto the pants, and then top stitch around the side and bottom edges of the pocket.
  • Insert the elastic into the waistband: Attatch a large safety pin to your elastic and thread it through the waistband. When it is pulled through, sew the ends of elastic together.
  • Hem the pant legs: as per the waistband, fold the bottom edge of the pant legs up by 6 cm, and then tuck the edge of the pant legs under again by 2 cm. Iron and pin. Sew down the hem.
Gib being a robot (a robot in need of a haircut)

Rear view, with pockets

Sunday, 13 July 2008

Tissue box cover

Yesterday I had a bit of spare time and decided to give Lara Cameron's tissue box cover tutorial a go. It was an easy to follow tutorial and a quick project to complete. And now I have something practical, bright and cute to go into my dull, stark white office at work.

Saturday, 12 July 2008

Reversible journal cover

I found Lara Cameron's reversible journal cover tutorial and decided to give it a go. Amazingly I still had motivation to sew after finishing the apron. This tutorial was very easy to follow, and even though I couldn't visualise how it works in my head (have I mentioned I have terrible spatial skills?), I followed the instructions as they are and when I turned it the right way out, hey presto, I had a reversible journal cover! Nifty! The whole project, from measuring the journal and cutting out the pieces to stitching up the hole at the end, took about 40 mins. And the finished product looks good too.


Inside view of the notebook cover, without the notebook

Thursday, 3 July 2008

My favourite sewing tutorials all in the one spot

Ack! I have several links to tutorials of things I want to make (or have made and want to remember where I found them), but I just can't keep up. So I'm dumping them here in a central location.
  • Craftzine: The ultimate idea and tutorial site!
  • Craft apron: I made a couple of these for cousins of mine at Christmas. A fantastic tutorial. I want to make one for myself.
  • Tissue box cover: This looks so easy. Why haven't I made myself one sooner? My office would be so much cooler with one of these.
  • Tutorials for what to do with old pillowcases.
  • Vegbee does some awesome tutes. I really want to make this scoodie!
  • Or maybe try out this scoodie... (instructions down the bottom of the page)
  • Baby softshoes
  • ... and bibs.
  • One Red Robin's pencil and notebook holder: Great idea! She makes such lovely things!
  • A zippered wristlet. For when I go down to the pub, dont' want to carry a whole bag, but don't want to lose my wallet either.
  • A simple sling bag that looks very pretty.
  • A snack bag. Such a great idea and so quick and simple! I love my snacks but hate using those ziplock bags all of the time.

Saturday, 28 June 2008

Wasp cake: final product

Well it is complete. I wasn't sure how it would turn out, but as with most things I make, I just started and just rolled with it. I should mention that this is simply a description of how I made the cake, and I'm certainly not saying that it's the best way or the quickest. I wanted to write down the process so I can learn from my cake making endeavours for the future, and if someone else can gain some inspiration on the way, then all the better. I really have no idea about cake making: I just think of something and try to make it using cake as my medium.

How to make your very own Spider Hunting Wasp cake:


I made the cake (the innards) a few days ago. As I've mentioned before, if I'm making a character cake, I always like to make the cake in advance because it's so much easier to carve and work with and also means that I have time in case it doesn't work (my cakes have a habit of not working under pressure!). Because of the shape of the wasp, I decided to make the cake in two loaf tins. I made a lemon loaf cake based on these two recipes. I like my lemon cakes to be really lemony, and this one is certainly lemony!

Beth's superzesty lemon cake

Makes 2 loaf cakes. Can be frozen.

250 g butter, at room temperature
2 cups sugar
1/3 cup grated lemon zest (6-8 large lemons)
1/2 cup lemon juice
4 eggs
400 g Greek-style yoghurt
3 cups self raising flour, sifted
1 tsp baking soda
1 tsp vanilla extract
  1. Preheat oven to 180°C. Line base and sides of 2 x 7cm-deep, 10.5cm x 20.5cm (base) loaf pan with baking paper, allowing a 2cm overhang at both long ends.
  2. Cream the butter, sugar and lemon zest with an electric mixer until light and fluffy. With the mixer on medium speed, add the eggs, 1 at a time.
  3. Combine lemon juice, yoghurt, and vanilla in a separate bowl.
  4. Add the flour, baking soda and yoghurt mixtures alternately to the batter, beginning and ending with the flour.
  5. Divide the batter evenly between the pans, smooth the tops, and bake for 45 minutes to 1 hour, until a cake tester comes out clean.
To make the wasp:

For the body:
  • 1 packet of Orchard icing
  • Food dye
  • 1 packet of dark melting chocolate
  • 1 Kinder Surprise or Easter egg (for the eyes)
  • Apricot jam

  • Prepare your mounting board if needed. I use a large wooden chopping board covered with gift wrapping foil.
  • Shape the cake and round any edges. You will need a head, thorax and abdomen. I made the head and thorax out of one loaf but cutting 1/3 of the end of the cake (for the head) and the rest for the thorax. I rounded the head and made the thorax pointed at one end. The second loaf was used for the abdomen. Mine ended looking up like so:
  • Using bamboo skewers, join the 3 body pieces together as below. I used two skewers to attach the head to the thorax, through the front of the head. I used one skewer to attach through the top of the abdomen through to the thorax.

  • Roll out the Orchard icing as per instructions. I chose to colour my wasp orange. Make strips for the segments on the abdomen.
  • Start with the abdomen. Brush the abdomen with apricot jam. Lay the strips of icing over the top of the cake and press gently so it attaches to the cake.
  • For the thorax, I rolled out a big square of icing, laid it over the top of the cake and with a sharp knife I cut it to shape. I rolled the icing back to apply the jam onto the cake, and then pressed the icing back into place.
  • For the head, I removed the cake head piece, rolled out circle of icing, brushed the cake with jam and wrapped the icing around it. I stuck the head back on.
For the wings:
  • 1 x 500 g packet of air drying clay
  • Aluminium foil
  • 500 g packet castor sugar
  • 1/2 cup water
I should mention that this is the abridged version of how I made the wings. I spent a bit of time over the past week tinkering with different ideas, different moulds, but in the end I decided to make my own mould for the wings out of cheap, air drying clay that I picked up at my local craft shop. I made two wing moulds (wasps have two sets of wings). I then wrapped the clay moulds in aluminium foil and poured the toffee in. Because I only had one mould, I had to make the wings in two batches.
  • Lightly coat the aluminium covered moulds with spray oil.
  • In a saucepan (don't use a dark coloured saucepan!), heat 250 g sugar and 1/4 cup of water together. Leave it to bubble, without stirring, until it turns golden brown.
  • Quickly pour it into the prepared moulds. Leave to set on the bench for 30 mins.
  • Avoid getting water on your toffee or it will turn to liquid.


For the legs, antennae and eyes:
  • Melt your dark chocolate. I'm lazy and melt chocolate in the microwave.
  • Lay down a sheet of aluminium foil on the bench. Using a teaspoon and a skewer, spoon out chocolate onto the foil and smooth out to make the shape of a leg. Leave to set for a few minutes, then turn the leg over. Apply chocolate to the other side to give the leg more "body".
  • For the antenna, carefully draw a thin line of chocolate across the foil with the edge of the teaspoon. Build up the chocolate with a few extra layers if it's too fragile. It doesn't matter if it looks a bit blobby or rough: wasp antennae are moniliform!
  • I attached the legs to the body by literally shoving the edge of the leg straight into the cake.
  • I gently pried open the kinder surprise using a sharp knife, then wedged the halves into the side of the head. I then attached the antennae in the same fashion as I attached the legs.
  • Using a paintbrush, I made lines across the back of the plates of the abdomen with melted chocolate.
Mounting the wings:
  • This was a challenge that I hadn't really thought through when I started the whole project. In the end, I jammed the wings into the back of the head, which seemed to work fine. I needed to remove them for transportation though. I would probably do this right before the cake is to be presented, or alternatively make the wings thinner in future, because the weight was a bit too much for the head in the end, and it ended up partly caving in. It was able to be patched, but just a reminder for myself for the future.

This photo is just before I brushed down the icing sugar off his face. A post-icing-sugar-face photo to come!

Sunday, 22 June 2008

Terry the Tarantula

Meet Terry the Tarantula. He will soon be posted to Mikes for their Softies for Mirabel appeal. I decided to make a spider because when I was getting inspiration for my little creation, I found so many patterns for softies for girls. Flicking through pattern books, I kept finding instructions for dolls, kittens, fluffy bunnies... and the softies I did find for boys were all made with pastel colours and weren't very boyish at all! And there's nothing more boyish than a big, black, hairy spider! I also figured a spider would be quite straight forward to make. The best part about working with the medium pile fur fabric is that most of your stitching and seams can be easily concealed. I documented how I made him in case your want to sew your own spider toy. He's about 25cm in length.

A disclaimer: I'm not well practiced in writing instructions so if there are any questions, please ask me! Also, apologies for my dodgy diagrams. The photos were of poor quality (black fur fabric + black thread isn't a great for photos) and Illustrator keeps crashing, so I have resorted to making the images with Paint.


How to make Terry the Tarantula

You will need:
  • Medium pile black fur fabric, 30cm x 110 cm
  • A small square of white polar fleece
  • Black cotton thread (good quality, as you will be doing some gathering and cheaper cotton may break)
  • 2 x 25mm white safety eyes
  • Small scraps of fabric for the fangs
From the black fur fabric cut:
  • 2 large circles, the size of a dinner plate (~30 cm diameter)
  • 1 small circle, the size of a tumbler rim (~10 cm diameter)
  • 8 strips of fur fabric, 15 cm x 4 cm
When cutting fur fabric be careful to only cut the backing material, not the pile. Make small cuts into the backing fabric using the tip of the scissors. I do not recommend doubling the fabric when cutting out your pieces.


Make the head/body (a.k.a. 'cephalothorax'):
  1. Take one of the large circles and make a running stitch right around the edge, approximately 1cm in from the edge, and .5 cm stitch length. Pull tightly so the edges gather up to create a ball, being careful not to snap your thread. Tie off. (The fur fabric will not gather up completely, so you will be left with a hole in the bottom that will later be covered over with the smaller circle of fur fabric).
  2. With each of the 8 strips of fabric, fold them in half with the pile facing outwards. Do a whip stitch along all 3 sides. The depth of your stitches should be small (~3mm) and closely spaced. You may need to brush the fabric pile downwards to expose the edge of your fabric and to prevent any of the fur getting caught in the seam.
  3. Sew each leg securely to the side of the body, 4 each side, using ladder stitch, about 3 cm from the edge of the hole in the body piece.
  4. Insert the safety eyes at this point. I like to half stuff the body so I can see how the fabric and eyes will sit when the fabric stretched out. I place the eyes, carefully remove the stuffing, insert the eye backings and then re-stuff the toy. There is a tutorial here on how to install safety eyes. When you are done with the eyes, finish stuffing the head/body.
  5. With the small circle of fabric, place it over the hole and the edges of the legs. Stitch it down with ladder stitch. Make sure that your stitches are small and catch all of the fabric underneath so that it is secure.
Make the abdomen:
  1. Take the second large circle and gather as per the head/body. Stuff.
  2. Attach the abdomen to the body with ladder stitch, making sure your stitches are small and tight as possible.
Attach the fangs (chelicera):
  1. Cut two triangles out of fabric scraps, 4 cm wide and 5 cm tall. I used old, green curtain fabric.
  2. Fold in half, stitch down the side. Turn out.
  3. Turn the top edge in and ladder stitch closed so you have a closed, triangular shaped fang.
  4. Ladder stitch to the head, just below the eyes.

Sunday, 25 May 2008

How to make a heat pack for your pet rat

We have two small friends who have recently joined us in the bungalow: Kit and Pippa. They are 8 week old black hooded rats. Unfortunately rats have had a bit of a poor reputation throughout history, mainly from being blamed for the plague - which was actually spread by fleas - but they make fantastic pets. They're exceptionally clean creatures, they don't smell (unlike their cousins, the mouse) and they are exceptionally smart. I've had pet guinea pigs in the past, but they're daft creatures - cute, but daft. I like a pet that can think independently but still hang out with you and be sociable... and are cheap to maintain. A rat totally fits the bill.

Our little critters need to keep warm because they're so small and because it's so cold here in Melbourne right now. So Saturday afternoon I made them a heat pack (with assistance) to keep them warm at night.

To make your own heat pack for your small pets:
I made my heat pack with a double layer of fabric in case they decided to have a nibble. I made mine out of a light canvas, but you could use cotton drill, corduroy or any other similar fabrics.

You will need:
  • 2 15 x 25 cm rectangles of fabric
  • 2 12 x 22 cm rectangles of fabric.
  • Lentils, ~300 g. You could also use rice or beans, but I'd not recommend wheat as they will be more inclined to eat that.
Make the inner pack: Sew around all four edges of the 12 x 22 cm rectangles, leaving a 5 cm gap. Clip the corners and turn out the rectangle. Fill with lentils. Stitch down the edge.
Make the outer cover: Sew around 3 edges of the 15 x 25 cm rectangles. Insert the inner pack. Fold in the edge of the outer cover and top stitch down to close. Top stitch around the remaining 3 edges.

To heat:
Microwave for 1.30 mins on 80% (800W microwave).

I had some assistance with this one

Perhaps I should make one for myself?

Friday, 4 April 2008

Aprons!

I really hate washing. Well, it's not the washing I hate, it's the bit where I have to hang stuff on the line, and then unpeg them again. It's just that you have to have your arms up in the air all the time: walk over to the peg basket hanging on the line, grab some pegs, peg your clothes, walk back again... I feel like a gibbon! And my arms get tired! So I can give my arms some relief I made a peg apron with some cute fabric I picked up at the Salvos in Oakleigh today. I got the fabric free with a bunch of other stuff I bought. In the photos below, it's quite obvious just how short I am!

To make your own peg apron:
  1. Cut out three rectangles of fabric for the backing, lining and pocket: 12" x 24". Cut 2 x 28" long strips of twill tape for the ties. I cut my backing from a canvas drop sheet I bought from the local hardware store.
  2. From the pocket material, get a large dinner plate and trace around 1/4 of the plate on each side to mark the pockets. Cut the pockets out and sew bias binding along these edges.
  3. Layer your fabric pieces: lining, pocket piece, canvas. Insert the twill tape 1" from the top of each side, so that they are pinned between the lining and the canvas. Pin down the rest of the sides, leaving a 10cm gap along the bottom edge, where you will turn the aprong the right way out.
  4. Sew along all 4 edges, except for your 10cm gap. Clip the corners, turn your apron the right way out.
  5. Iron your apron, particularly along the edges so that they sit flat! Sew up your 10cm gap with an invisible stitch and you're done!

Here is another apron I finished off a bit earlier in the week. It's for a friend's engagement present. She does karate and loves cooking (much like me!) so I thought I'd go with a bit of an oriental flavour for her apron. It's reversible too (pattern from Lotta Jansdotter's Simple Sewing book). I'm in the process of making her some matching oven mitts to go with it. The chopsticks are machine appliqued, the noodles are white ribbon with a stitch down the middle to keep them in place, and the pocket is lined with a white, light cotton fabric, and then zig-zag stitched around the side and bottom of the bowlto keep it in place.


With all of this apron making, I think I should sign up for the next sassy apron swap...