How to make your very own Spider Hunting Wasp cake:
I made the cake (the innards) a few days ago. As I've mentioned before, if I'm making a character cake, I always like to make the cake in advance because it's so much easier to carve and work with and also means that I have time in case it doesn't work (my cakes have a habit of not working under pressure!). Because of the shape of the wasp, I decided to make the cake in two loaf tins. I made a lemon loaf cake based on these two recipes. I like my lemon cakes to be really lemony, and this one is certainly lemony!
Beth's superzesty lemon cake
Makes 2 loaf cakes. Can be frozen.
250 g butter, at room temperature
2 cups sugar
1/3 cup grated lemon zest (6-8 large lemons)
1/2 cup lemon juice
4 eggs
400 g Greek-style yoghurt
3 cups self raising flour, sifted
1 tsp baking soda
1 tsp vanilla extract
- Preheat oven to 180°C. Line base and sides of 2 x 7cm-deep, 10.5cm x 20.5cm (base) loaf pan with baking paper, allowing a 2cm overhang at both long ends.
- Cream the butter, sugar and lemon zest with an electric mixer until light and fluffy. With the mixer on medium speed, add the eggs, 1 at a time.
- Combine lemon juice, yoghurt, and vanilla in a separate bowl.
- Add the flour, baking soda and yoghurt mixtures alternately to the batter, beginning and ending with the flour.
- Divide the batter evenly between the pans, smooth the tops, and bake for 45 minutes to 1 hour, until a cake tester comes out clean.
For the body:
- 1 packet of Orchard icing
- Food dye
- 1 packet of dark melting chocolate
- 1 Kinder Surprise or Easter egg (for the eyes)
- Apricot jam
- Prepare your mounting board if needed. I use a large wooden chopping board covered with gift wrapping foil.
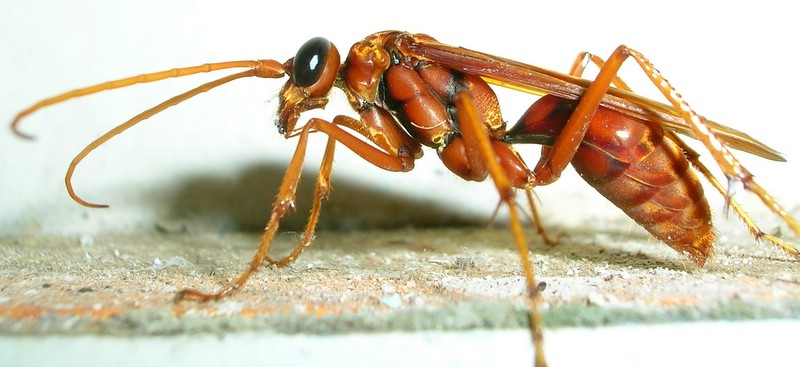
- Shape the cake and round any edges. You will need a head, thorax and abdomen. I made the head and thorax out of one loaf but cutting 1/3 of the end of the cake (for the head) and the rest for the thorax. I rounded the head and made the thorax pointed at one end. The second loaf was used for the abdomen. Mine ended looking up like so:

- Using bamboo skewers, join the 3 body pieces together as below. I used two skewers to attach the head to the thorax, through the front of the head. I used one skewer to attach through the top of the abdomen through to the thorax.

- Roll out the Orchard icing as per instructions. I chose to colour my wasp orange. Make strips for the segments on the abdomen.
- Start with the abdomen. Brush the abdomen with apricot jam. Lay the strips of icing over the top of the cake and press gently so it attaches to the cake.
- For the thorax, I rolled out a big square of icing, laid it over the top of the cake and with a sharp knife I cut it to shape. I rolled the icing back to apply the jam onto the cake, and then pressed the icing back into place.
- For the head, I removed the cake head piece, rolled out circle of icing, brushed the cake with jam and wrapped the icing around it. I stuck the head back on.
- 1 x 500 g packet of air drying clay
- Aluminium foil
- 500 g packet castor sugar
- 1/2 cup water
- Lightly coat the aluminium covered moulds with spray oil.
- In a saucepan (don't use a dark coloured saucepan!), heat 250 g sugar and 1/4 cup of water together. Leave it to bubble, without stirring, until it turns golden brown.
- Quickly pour it into the prepared moulds. Leave to set on the bench for 30 mins.
- Avoid getting water on your toffee or it will turn to liquid.


For the legs, antennae and eyes:
- Melt your dark chocolate. I'm lazy and melt chocolate in the microwave.
- Lay down a sheet of aluminium foil on the bench. Using a teaspoon and a skewer, spoon out chocolate onto the foil and smooth out to make the shape of a leg. Leave to set for a few minutes, then turn the leg over. Apply chocolate to the other side to give the leg more "body".
- For the antenna, carefully draw a thin line of chocolate across the foil with the edge of the teaspoon. Build up the chocolate with a few extra layers if it's too fragile. It doesn't matter if it looks a bit blobby or rough: wasp antennae are moniliform!
- I attached the legs to the body by literally shoving the edge of the leg straight into the cake.
- I gently pried open the kinder surprise using a sharp knife, then wedged the halves into the side of the head. I then attached the antennae in the same fashion as I attached the legs.
- Using a paintbrush, I made lines across the back of the plates of the abdomen with melted chocolate.
- This was a challenge that I hadn't really thought through when I started the whole project. In the end, I jammed the wings into the back of the head, which seemed to work fine. I needed to remove them for transportation though. I would probably do this right before the cake is to be presented, or alternatively make the wings thinner in future, because the weight was a bit too much for the head in the end, and it ended up partly caving in. It was able to be patched, but just a reminder for myself for the future.


