Tuesday 29 July 2008

An octopus cake

Why an octopus birthday cake?

Yesterday was Gib's birthday so, at his request, I baked him a rhubarb cake in the new octopus cake tin. The octopus was very appropriate given that his birthday present was an introductory scuba diving course! He's always loved rockpools and marine life (his university major was in marine biology) and some of my best memories of us hanging out together was when we were teenagers, going camping down at Port Fairy and running along the rockpools, harassing star fish and watching elephant slugs chomp down on sea lettuce. He would turn over rocks looking for chiton, flatworms and crabs to show me. The octopus is his favourite animal though. While at Osaka aquarium I think we spent over two hours watching octopuses, mostly the giant pacific octopus, do their thing. If you want to know more about why octopus are so damn cool, I'd suggest Pharyngula as the place to learn more.


Making the cake:

To make the cake I followed this recipe but with some modifications to account for all of the dietary requirements of the family (diabetic and lactose free). Diabetics didn't eat the icing. Here is my version of the recipe:

Buttermilk rhubarb bundt cake
  • 2 cups plain flour
  • 2 teaspoons baking soda
  • 1 teaspoon allspice
  • 1/2 cup CSR Smart sugar
  • 1/2 cup dairy-free margarine (I used Olive Grove classic spread, the mild tasting one)
  • 3 teaspoons lemon juice
  • 2 cups reduced fat soy milk
  • 2 large eggs, lightly beaten
  • 3 teaspoons red food coloring (I wanted it really red on the inside!)
  • 2 teaspoons vanilla essence
  • 4 cups cut fresh rhubarb or frozen rhubarb, thawed, drained (although I forgot to thaw and drain mine and it worked out fine)
  1. Preheat oven to 180°C. Coat bundt pan with spray oil.
  2. Combine milk and lemon juice, set aside.
  3. In mixing bowl add flour, allspice, baking soda, salt and sugar.
  4. Add margarine and cut in so mixture resembles crumbs.
  5. Combine eggs, food colouring and vanilla. Add to dry mix, along with milk, about 1/4 at a time until combined. Mix through rhubarb.
  6. Spoon cake batter in the pan. (Note: I was quite concerned because the mixture was very runny, but I decided to trust the recipe and it worked out fine). Bake 55 minutes until top springs back with a touch and sides shrink away from pan. Cool ten minutes and invert onto cooling rack. Allow to cool completely.
Decorating:

You will need:
  • Half a packet of Orchard icing
  • A candy necklace, for the suckers
  • A packet of mini licorice allsorts, for the eyes and rocks
  • A packet of fruit tingles, extra decoration
  • Raw sugar, for sand
Colour the orchard icing to whatever octopus colour you like. I aimed for red, but no matter how much dye I added it still turned out to be a rich pink colour (Gib doesn't mind!). Roll it out and drape it over the top of the octopus, pushing it and moulding it around to cover the legs. Using a sharp knife, cut off any extra icing.

Decorate with the rings from the candy necklace for the suckers. The eyes were attached with toothpicks. The base of the cake was brushed with honey and water mixture, and then sprinkled with raw sugar for sand. The star fish were moulded out of leftover Orchard icing.

A weekend adventure to The Grampians

Friday morning Gib and I jumped into the car and headed off, filled up the petrol tank and ended up... in The Grampians National Park. It's about 3.5 hours drive from Melbourne - or closer to 4 hours if you forget to take the ring road and end up in Werribee instead (both driver and navigator got distracted by an interesting discussion on Triple J). It's a favourite destination for both Gib and I, although we've never holidayed there together before. We stayed in the National Park camp grounds because they're dirt cheap - you get drop toilets and no showers, but we were only intending to stay overnight anyway... but it ended up being two nights. We slept in the back of the station wagon: a convenient, portable "tent". Amazingly, the weather was perfectly cold and sunny the whole time we were there. After all the hiking we did, we were quick to leap into the shower when we got home.

The view out the back of our "tent". There were plenty of kangaroos in the vegetation.

We were a little unprepared: We had gin, tonic water and even limes, but no cups. Cups would have also been useful for the tinned soup we brought. A few extra bottles of water wouldn't have gone astray either, but we managed to make some good camping improvisations by getting water from waterfalls and boiling it for ages. We made pancakes out of tonic water. Perhaps an extra pair of warm pants wouldn't have gone astray either as it was extraordinarily cold at night.

Day one: McKenzie Falls and Briggs Bluff

We stayed at Smith's Mill camp ground, which is stones throw to the McKenzie falls. We sat in the car park having the classic camping breakfast: bite the middle out of a piece of bread and crack an egg into the middle and fry it up til it's all golden on the outside and gooey on the inside, but we had a hard time fending off a family of 12 carrawongs. We were down at the falls nice and early, about 8am, but still by 8:30 there was a crowd of tourists coming down. The McKenzie falls are far more impressive in winter than summer.

Breakfast at McKenzie falls

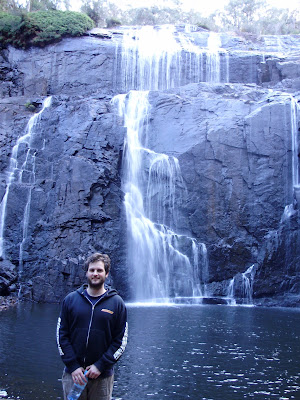
Gib at McKenzie falls

The Briggs Bluff walk was fantastic. It was about 4 hours return (estimated 3.5, but we took a wrong turn). While the view from the top wasn't nearly as breathtaking as other climbs, the walk itself was stunning. The terrain was so varied on the way to the top, starting with Beehive Falls, through forest, large boulders and sandstone, and other parts were open, rocky and swampy.

We were astounded at the number of carnivorous plants we found. Until a few months ago we hardly knew anything about carnivorous plants. Then after going to just a couple of the Victorian Carnivorous Plant Society meetings for advice on our plants, we learned that there were more than just Venus fly traps and your standard pitcher plants. Just by sitting in on meeting we absorbed information about the local, native species, and while we were in the Grampians we were able to spot them everywhere. It's amazing what's right under your nose without even knowing. I'm sure I've seen these plants a thousand times and thought they were just another moss or something.

Various carnivorous plants on the way to the top of Brigg's bluff

On the way to the Grampians we had joked about whether we'd see any Asterolasia phebalioides, the endangered plant that I picked up and have struggled to keep. l specimens, about a metre tall, with light green fluffy leaves, looking much happier than mine. I have wanted to see them growing so I can get a better idea on how to better manage my one at home. They're only found in a few pockets around Australia, and only in a handful of places in the Grampians. On the way up to the bluff we saw other Asterolasia but not the A phebalioides, but then to my absolute astonishment I found one on the way back. Beautiful, about a metre tall with thick light green leaves, looking much healthier than my one. Then we started spotting them all over the place in an area about 2/3 of the way to the top of the bluff. Coincidentally we'd found the best spot for them. Apparently the area surrounding Beehive Falls is home to the largest population.

A healthier specimin of Asterolasia phebalioides

Day two: Mount Stapylton

My favourite walk in the Grampians, up until now, has been Mount Hollow. I think that has now been surpassed by the walk up Mt Stapylton. The entire way along the walk is totally amazing: there are beautiful, sheer rock faces and stunning views the whole way. It's easy to navigate and the first part is a flat surface but quite steep, and then it sweeps down to an easy forest track. You walk past the Taipan Walls which are spectacular orange cliffs, through more shrubbery and then climb up some rocks to the first ledge. I was thinking at this point that it wasn't so bad, what are all of the reviews talking about when they say that people never make it to the top? It's at this is the point in the track where the yellow markers end and the red markers begin.

The red section of the track isn't so much physically challenging (it's definitely tougher but there are plenty of knobbly rocky hand holds) but it's a test of your mind. We took the red arrow to the left, which leads you across a couple of very precarious ledges. The first was about a foot wide and then you have to climb up through a narrow hole onto another rather precarious ledge which is a bit less than a foot wide and much more exposed. My toes are going numb just writing about it now. There's a nice flat rock face angling back that you can cling to for your life and eventually you reach a rocky outcrop with some rock pools. I don't particularly like heights, but this was the first time I've felt physically ill from heights. I think I could have coped better if there wasn't so much wind. I looked up and there was one short, final scramble to the top. It was steep and even more exposed. The hair raising experience on the previous ledges had totally done my head in and I just could not bring myself to do the last bit. I sat admiring the stunning view in a tight ball of petrified mess, wondering how on earth I'd make it down. Gib leaped like a mountain goat to the top, took videos and everything (bastard). He tells me that the ledges were much harder and that the last section is quite easy: just climb up through some nobbly rocks and you're there.

Will I do it again? Absolutely!

The track leading to Mt Stapylton peak. The orange cliffs are the Taipan walls, a popular place for rock climbing.

Me, freaking out, not far from the final ledge near the peak. The narrow path below me is about 2 meters wide at that point. The trees behind me are a couple of hundred meters below me (refer to picture above - you can see where the line of trees are below the shelf that I'm on).

Sunday 27 July 2008

This is... one of my other interests

I decided to get on board the "This is..." meme that's going around. I've thought about joining in for about a month now, but I haven't because I'm slack. But this week I finally decided to make a move and join in on the create-your-own this is...!

So I thought I'd take this as an opportunity to mention one of my other interests that I don't cover on this blog but is the one that pushes everything else I do in my life: karate. I started as a kid, age 8, wanting to keep up with my brother and be a ninja turtle, but it's more of a lifestyle for me now.

I love the physical aspect of it. The discipline. Pushing my body (and other people's!) to its limits, seeing what its capabilities and limitations are. The adrenaline rush. Making sure I maintain a good diet and get plenty of sleep, so I can tend to any injuries nice and early to prevent re-injury. It's about pushing myself to the edge but also listening and respecting my body as well.

Then there's the mental side to karate. It's the solid training in these things alongside the physical training that makes the martial arts different to any other fighting arts. In the way that science is a method for furthering the objective understanding about the world around us, karate is a method by which to understand yourself and your relationship with everything around you. My karate doesn't stop when I leave the dojo: it's in everything I do, but my "opponents" change. For example, to be successful in growing vegetables, you have to watch your vegetables throughout the seasons, see what they like and what they don't, and you can start to exploit that so that they're productive all of the time. The same "dance" or rhythm that exists in a fight with another person is right there in everyday things and the same way of thinking can be applied to both. But there's also a fundamental respect and humility that is cultivated as well.

One of my favourite places: The entrance to Kyoshi Mike Clarke's dojo in Launceston, Tasmania.

There are other ways, and possibly better or easier ways to become a fighter and to get fit and to learn about yourself and others but it's all about what works for you and karate is the one that speaks to me most, makes the most sense to me. I often think that if everyone chose to study a martial art then the world would be a calmer and happier place.

Thanks to Angela for hosting This is... It seems like everyone is onto it and it looks like so much fun!

Thursday 24 July 2008

Outta here!

There wont be any posts from me for the next couple of days because this morning Gib and I decided over breakfast that tomorrow we'd head off somewhere overnight. We don't actually know where we are going... we are literally going to load up the station wagon and go and see where the road takes us.


I love the flexibility of being a student again!

Wednesday 23 July 2008

Trombones and not-so-senile grandmas

Gib's grandma was visiting on he weekend. She's one of those cool grandmas: she's feisty, witty, out socialising with her friends every day, out walking every day and she is always up for trying new things. For example, she went to see Gib's cousin's band play at the Espy and was even doing the devil horns! But at 89, she's sometimes not so sharp, the memory is going a bit.

We were sitting around having dinner. I'd cooked up some pumpkin soup and toast and were were all quiet, busy eating. Then, out of blue, Grandma announces "I love trombone!". We all stopped and gravely looked at each other. We thought Grandma had totally lost her marbles this time.

It took some time, but we eventually worked out that she hadn't actually lost the plot and that a trombone is a type of pumpkin, similar to a butternut. Amazing, who'd have thought? Then last night we were wandering through the fruit and veg section of our local Safeway, and for the first time ever I saw a trombone pumpkin, sitting on the shelf. I think it must be a new line because it was on the top shelf in the top corner (where they put all "new" and "unusual" produce).


Unfortunately I don't have a photo because my mother has my camera cable at the moment! So here are photos of trombones from here and here.

One another note, while we were standing at the checkout, I noticed that at the end of every single aisle was some form of junk food on special: chips, chocolate biscuits, slabs of cola, more chips. Then above every aisle was their slogan: Safeway the fresh food people.

Hmmmm.

Sunday 20 July 2008

A cake tin and a half!

Gib's mum just arrived back home today, after being in America for almost a month. Apart from bringing home lots of crazy stories, she also brought home this...


...for me! I couldn't believe it! Not only because it is just a totally amazing cake tin (it's a Nordic tin, like the castle tin), but because, unknown to Gib's mum, I was planning to make Gib an octopus cake for his birthday next week! I am so excited, I can't wait to try it out.

Gib's mum is so lovely. She's so patient and tolerant and calm (I guess living in a house with three males will do that to you). She always takes things - and people - as they come. I have a lot to learn from her.

Melbourne Design Market

I'm going to be attending this today:

Melbourne Design Market

Date: 10am-5pm, Sunday 20 July
Venue: Undercover Carpark, Federation Square. Enter via Russell Street extension or Atrium underpass.
Cost: FREE

See you there!

Friday 18 July 2008

My Downy Starbush (Asterolasia phebalioides)

About a year ago I was visiting Kuranga Nursery when I found this curious shrub going out for cheaps. It stood about 30cm high, had small, green furry leaves (I love anything with furry leaves) and it had a little handwritten tag saying: Asterolasia phebalioides. Kuranga have a great information centre, so I went and ask the attendant there. They pulled out a big, thick book, and it had just one small entry which read:

"Not easy to maintain. Needs perfect drainage. May be best grown in a rockery"

That's all.

It sounded like a handful, but I was so taken with its little furry leaves I decided to take it home... for just $3.

I asked a native plant forum for tips, but they only had as much information as Kuranga. Google didn't have much either, but I found out that it is listed as "vulnerable" and "rare" and is found in just a handful of places: the Grampians National Park, Little Dessert National Park and Kangaroo Island (where it is listed as endangered), and is under threat from salinity. In this document I found out slightly more information:

Species Characteristics: Small slender shrub to 1.5 m high; branchlets densely grey-tomentose with silvery and ferruginous hairs. Leaves densely crowded, lacking obvious petioles, broadly cuneate, less than 1 cm long, densely stellate-tomentose. Inflorescence terminal with subsessile solitary flowers; calyx minute; petals 8-10 mm long, golden yellow. (Armstrong & Telford, 1986).

Habitat: The species grows on sandy, acidic soils derived from sandstone. In the Grampians the species occurs as part of dense heathy shrub layers between 1 and 1.5 m high, with sparse canopies of trees such as Oyster Bay Cypress-pine (Callitris rhomboidea) and Brown Stringybark (E. baxteri) (Overton et al., 1990).

Life History: The species appears to be long-lived, and is an early coloniser following fire and soil disturbance by humans and native mammals (Overton et al., 1990). Sexual reproduction, and subsequent establishment from seeds. The species is an obligate seed regenerator; nearly all plants are killed by fire, and regeneration is solely from seed stored in the canopy or in the soil for a short time pre-fire. It tolerates occasional major disturbance and requires such disturbance for the rare opportunity to establish and spread (VRFAF).

How I currently keep it:

Perhaps not the most beautiful specimen ever. This poor thing does struggle!

I have it currently growing in a pot, with some coarse rocks in the bottom, then some smaller rocks, and finally filled in with a combination of sand and potting mix. I occasionally water it, but try to ignore it as much as possible as I am conscious of root rot. The pot is in part shade and gets mostly afternoon sun. It hasn't grown much since we got it, and the leaves go a very (alarmingly?) dark green colour in summer, but it seems to be starting to put a few new shoots at the moment. It seems to be a bit of a slow grower. After my cat, Monty, sat on it (what on earth is it with cats and pots?!), it has a bit of a lean and now has a stake to keep all cats off. It has flowered regularly in the past year, which is a good sign I think. It produces these adorable little bright yellow star shaped flowers, so I am pleased.

I am scared though. Looking after this plant is, for me, is like looking after a fragile alien. There isn't much information out there, and less about how to look after one in your backyard. I would love to find someone else who has one because I really have no idea what to do with it and I am scared to death of killing it!

I would love to learn how to propagate this thing because I think it is one of the coolest looking plants ever. I would love to have more of them!


List of resources:
Update (22/7/08):

I have just received an email from Kuranga. Looks like we'll need to relocate it. Here is there advice:

I have sourced some information from Elliot and Jones Australia plant encyclopedia and they recommend that Asterolasia phebalioides is grown in a very well drained light-medium soil. Growing plants in pots creates a very different root environment and it is recommended with most plants in pots that you use a good quality potting mix. If you are using soil or sand and rocks/pebbles in the base in a pot you often find that rather than draining better it actually compacts the root zone more. This may be causing the plant to be a little slow to establish. Elliot and Jones also recommend that you grow this plant in dappled shade or partial sun so definitely protection from afternoon sun. They mention that it should be alright in full sun as long as the root system is well protected, which in a pot it may not be best. I hope this is of some help to you in growing you Asterolasia.

Thursday 17 July 2008

Autumn Sassy Apron Swap

It's time to sign up for the Fall Sassy Apron Swap! I've participated in the last two (spring and summer) and they've been fun and challenging. It's interesting reading someone's blog, finding their likes and dislikes, and trying to make an apron that would suit them. I'm really excited about this one. Autumn is my most favourite season! I love the colours of the plants, I love the weather, I love the fruit and vegetables that are in season in autumn.


Here is are list of requirements for the next swap (abridged):

1. It has to be a hand made full coverage apron. The fabrics must be 100% cotton.
2. The apron must be durable (this doesn’t mean heavy fabric just it must stand up to washing, wiping hands and messy cooking.)
3. The apron’s theme is Fall or Autumn.
4. Since it if for the baking season, a hot pad or pot holder must be included.
5. You must include your favorite pie recipe.
6. Your aprons must be in the mail by September 1st.

Wednesday 16 July 2008

New additions to the carnivorous collection

Meet our new purple pitcher plant (Sarracenia purpurea) and Albany pitcher plant (Cephalotus follicularis, a Western Australian native) which were so kindly given to us by the Victorian Carnivorous Plant Society. The S. purpurea is currently living on the back verandah and we are ignoring it for a while. Apparently that's the thing to do with them in winter.


The C. follicularis is sitting in a north facing windowsill. There was another one growing on the same windowsill, and it grew very successfully (until it was moved to Gib's brother's greenhouse, where it was supposed to help it grow, but instead it died). I think these ones are quite cute, in their own little way! They're tiny at the moment, maybe 1cm big at most, but they grow to about 2-5 cm.


And meet my cat, Zoe. She is definitely not a "bright" cat (she is strange and stupid to a level you just will not believe unless you meet her), but she is beatiful nonetheless and I love her to bits and my most favourite cat we have ever had (probably because she is impossible to understand. Even the most aloof cats you can predict and understand eventually). Anyway, here she is sitting outside our kitchen window, wearing a wonderful garland of cobwebs, dead leaves and dead beauganvillia flowers. In the front of the photo you can see our sundews and venus fly traps too! We've had those for a while though.

Recent low GI dinners

Low GI Dinner #1 - Bean and corn burritos

Gib and I are currently "minding" his dad while Gib's mum is away overseas. His dad was diagnosed with diabetes a few months ago (his nickname is now "GI John"), and we're trying to keep him on the straight and narrow in Gib's mum's absence! So far so good. I tried out a recipe from my new 'Low GI Vegetarian Cookbook' that I was given recently. Of course, I can't resist changing a recipe, even one that I've never tried before (often because I prefer use what I have in the fridge instead of going out of my way to match a recipe). It was a quick and easy weekend meal. Below is my recipe (adapted from the bean and corn burrito recipe, p. 95).

Bean and corn mix (serves 4 - 6)
  • 1 tbsp olive oil
  • 1 spanish onion, sliced (using my mandolin! yeah!)
  • 3 cloves of garlic (we love garlic -- sorry!!)
  • 3 fresh corn cobs, kernels removed
  • 1 red capsicum, cut into chunks
  • 2 tsp ground coriander
  • 2 tsp cumin
  • 2 tsp hot paprika
  • 2 tsp dried oregano leaves
  • Jalepino peppers, to taste (I used about a handful of sliced jalepinos)
  • 4 fresh tomatoes, peeled and diced
  • 400 g tin red kidney beans, drained
  • 1/2 cup vegetable stock
  • 2 tbsp tomato paste
  • 1/2 cup vegetable stock
Other stuff
  • Avocado, sliced
  • Baby spinach, washed thoroughly
  • 1/2 cup reduced fat cheese
  • Wholemeal tortillas

Heat the oil in a large pan, fry the garlic on moderate heat for about 30 seconds. Add the onion, corn and capsicum, cook for ~5 mins. Add the spices, cook until fragrant (~1 min).

Add the chopped tomatoes, kidney beans, tomato past and stock. Simmer for 10 mins.

If your tortillas are a bit stiff and look like they're going to tear, heat them in the microwave for 30 seconds, with a damp paper towel placed between each tortilla. Pile the tortillas with bean and corn mix, sliced avocado, baby spinach and cheese and fold up the burrito.


Low GI Dinner #2 - Silverbeet and mushroom quiche

This one was adapted from this recipe, but it was more like a quiche than a pie. Very tasty, has been making for a great lunch. I served this with a side of roasted vegetabb,\
  • 2 tbs olive oil
  • 2 onions, finely sliced
  • 3 cloves garlic, chopped
  • 500g mushrooms (I had fresh swiss brown and shiitake on hand)
  • 1 bunch silverbeet, washed thoroughly and roughly chopped
  • Pinch nutmeg
  • Salt & freshly ground black pepper
  • 4 eggs
  • 300g silken tofu, mashed (you could use ricotta, but if you want a low fat protein boost, Japanese silken tofu is the way to go)
  • 1/2 cup grated reduced fat tasty cheese
Preheat oven to 180°C. Heat the olive oil in a large saucepan, add the garlic, saute for 30 seconds before adding the onion. Cook for ~5 mins or until soft. Add the mushrooms and saute for another 3-4 mins. Add the silverbeet, nutmeg and season, stir through and cover the saucepan and cook until the silverbeet wilts (~3-5 mins). Remove from the heat, stir through again and drain any excess moisture.

Transfer the silverbeet mixture into a large 6 cup capacity pyrex casserole dish (or whatever you have). Whisk the eggs and tofu together, season with salt and pepper and stir through the grated cheese. Pour the egg mixture over the silverbeet mixture and the egg mixture through the silverbeet.
Bake the pie for 40 mins or until golden and set. I cheated because I was in a hurry so I started it off in the microwave for 7 minutse before placing it back in the oven. It took about 10 mins off the cooking time. Allow to cool slightly before slicing.

Monday 14 July 2008

Easy peasy pants

I once taught Gib to make a pair of pants for himself, about 7 years ago when we were friends but long before we were going out. It was for some fancy dress party we were going to (he was being a pirate, I think). His pants then were made in exactly the same way I'm going to describe below. And it was in fact a guy who taught me how to make pants this way! More on guys and sewing here.

A bit crinkled -- I found them scrunched up in the top of the wardrobe! Can't believe they're still around!

Now times have changed and I'm the one making him a pair pants (coincidentally, these ones are blue and orange too!). They're bumming-around-the-house pants, so he can be comfortable while playing computer games, helping out in the kitchen (!!!) or while we're doing a bit of lounge room karate training. I picked up this awesome flannelette robot fabric when I absorbed a family friend's fabric stash. I am quite a lazy sewer so I like it when things don't have to be exact for them to work well, and these pants are perfect for hack sewers like myself.

How to make yourself a pair of comfy bumming-around-the-house pants in ~2 hours:


  • Take a pair of baggy pants. Turn them inside-out and fold them in half. Pull out the crotch so it sits flat.
  • Take your fabric, fold it in half. Lay your pants on the fold.
  • Cut around the pants, making sure you allow an extra 6 cm at the top for the waist and 6cm at the bottom for the hem. Follow closely to the inside leg, making sure you leave about 1cm for seam allowance (see pink line below). Be careful not to cut your pants too!
  • Cut the second leg out by tracing around the first leg you cut out, so that they are exactly the same.
  • Sew up the inside of the pant leg, from the point of the crotch to the bottom of the pant leg (see pink line -- sorry it's a bit dodgy!).
  • Pin and sew the crotch: This bit can be a bit confusing for me because my spatial skills arne't great. To help me visualise how I need to pin them, I turn the pant legs right side out. Take two corners from the top of each of the legs and pin them together. Continue to pin the pant legs along the U-shaped edge of the crotch to the back. When you are done you should have what looks like a pair of pants in front of you, with the seam of the pants on the inside (I have pinned and sewn them the wrong way so many times!). Turn the pants inside out again, for ease of sewing. Sew along the pinned crotch.
  • Make the waistband: fold the top of the pants down by 6 cm, and then tuck the edge of the waistband under again by 2cm. This means your waistband will be 4cm wide with 2cm tucked under so the raw edge won't be exposed. Iron and pin down. Sew along the pinned edge of the waistband, leaving a small gap (about an inch) through which you will insert the elastic. Top stitch around the top edge of your waistband: this help prevent the elastic in the waistband from rolling over while you're wearing the pants.
  • If you are adding back pockets, sew them onto the pants now. Take a piece of polar fleece, approximately 10 x 12 cm. Hem the top edge. Turn the remaining pocket edges under by 1 cm, pin down onto the pants, and then top stitch around the side and bottom edges of the pocket.
  • Insert the elastic into the waistband: Attatch a large safety pin to your elastic and thread it through the waistband. When it is pulled through, sew the ends of elastic together.
  • Hem the pant legs: as per the waistband, fold the bottom edge of the pant legs up by 6 cm, and then tuck the edge of the pant legs under again by 2 cm. Iron and pin. Sew down the hem.
Gib being a robot (a robot in need of a haircut)

Rear view, with pockets

Sunday 13 July 2008

Tissue box cover

Yesterday I had a bit of spare time and decided to give Lara Cameron's tissue box cover tutorial a go. It was an easy to follow tutorial and a quick project to complete. And now I have something practical, bright and cute to go into my dull, stark white office at work.

Saturday 12 July 2008

Reversible journal cover

I found Lara Cameron's reversible journal cover tutorial and decided to give it a go. Amazingly I still had motivation to sew after finishing the apron. This tutorial was very easy to follow, and even though I couldn't visualise how it works in my head (have I mentioned I have terrible spatial skills?), I followed the instructions as they are and when I turned it the right way out, hey presto, I had a reversible journal cover! Nifty! The whole project, from measuring the journal and cutting out the pieces to stitching up the hole at the end, took about 40 mins. And the finished product looks good too.


Inside view of the notebook cover, without the notebook

Finishing off the apron...

Here it is, all finished. It'd probably be better presented if it was being worn by someone, however it doesn't actually fit me. It's too long in the body -- it ties around my hips instead of my waist (they don't design patterns for adults under 5' tall). Doesn't matter though, because I was only testing an idea, and the finished product isn't for me anyway! But I'm pretty happy with it in the end, after all the trauma I had with the pattern.

Taste Sensation! Kickapoo Joy Juice

While in the local Asian grocer, we noticed that they'd stocked their drinks fridge so of course Gib had to stock up too. We bought a few different types, but this one is always a favourite, not only for the name (which cracks me up every time), but the taste:

Kickapoo Joy Juice


It's a citrus flavoured soda, produced by Monarch Beverages in Atlanta, Georgia, USA, and tastes similar to New Zealand's L&P (Lemon and Paeroa). It's lemony but with a bitter edge owing to it being made with tonic water. It was named after a drink that featured in Dogpatch comics. Made by Lonesome Polecat & Hairless Joe, it was "a liquor of such stupefying potency that the hardiest citizens of Dogpatch, after the first burning sip, rose into the air, stiff as frozen codfish". And it doesn't contain any caffeine.

Friday 11 July 2008

New purchase: Lotta Prints

I decided to purchase Lotta's latest book: Lotta Prints. It's been out for a while but I decided to buy it after finding it on Book Depository for just AU$16! I recently discovered this UK based company after recommendations from a couple of good friends of mine. Book Depository ships faster than Amazon, they're often the same price or cheaper than Amazon, and you don't have to pay for postage. Winner! Unfortunately I didn't find out about this sooner. I ordered some things for Gib's birthday that cannot be named from Amazon last week, and the expected time of arrival isn't until August 11 (2 weeks after his birthday! Urgh!). How can it possibly take 5 weeks to arrive? My Are they sending it by carrier pigeon? My Lotta Prints book, which I ordered two days ago, will arrive within a week. Maybe my Amazon order will arrive sooner than that and they are just giving me a generous ETA.

Anyway, I'm excited about the Lotta Prints book. If it's anything like her Simple Sewing book, then it's going to be easy and fun. And a messy too!


Wednesday 9 July 2008

Trying out a new pattern: Simplicity 3752 - Misses aprons

Last weekend I bought a new apron pattern. I don't normally buy patterns as I never usually make anything complex enough to require one. I have an idea in my head for an apron I want to make, but my prototypes so far haven't worked. I think maybe I need some sort of pattern drafting lessons, but until I can afford those, or until my brain magically develops better spatial skills (especially spatial skills involving fitting clothes around the female figure) I decided to take a look at what the big pattern companies had come up with. Maybe I could adapt a pattern from them. I liked this pattern, Simplicity 3752, particularly the blue one in the top left corner ('apron B'). It didn't require all that much fabric, so I was fortunate enough to be able to use leftovers to make it.


Making the apron: The instructions for it were fairly straight forward. It has a kind of corset-ish top, halter neck tie and a cute little skirt thing down the bottom, with a waistband. Apart from me accidentally sewing corset so that the wrong sides face outwards (my problem, not the pattern's), it was relatively straight forward to make. Until I got to the final steps: finishing the waistband. It was a total pain in the bum. If I had have followed their instructions, it would have been looked bulky and utterly ridiculous. The other problem I had with this pattern is that the smallest size still ended up being quite large, not so much around the waist, which was fine, but around the bust. I think you would have to be a E cup to be able to fit this properly. This large bust problem meant that when I tied it up as a halter, it kind of pushed the sides of the bodice out, making it look like I had big squid fins coming out the side of me (strange analogy I know, but I've been hanging out with my friend who is a diver).

To resolve the problem of the waistband: (I'm not sure if this will make any sense to those who haven't read the pattern, sorry!) I sewed the bodice to the waistband and the bottom edge of the waistband to the skirt, as per instructions. You are then supposed to fold the waistband in half and sew along the edge to join the bodice and skirt together directly, but in such a fashion that conceals their seams (this came out really bulky when I tried it). I'd then need to fold the waistband flat again, and top stitch the top and bottom. I thought about doing french seams, but that would have been too bulky too. In the end, I left the waistband wide instead of folding it in half, and attached another waistband lining piece to the back to conceal the seams. Worked out fine.

The problem of the "squid fins" around the bust: It looked entirely unflattering as a halter tie. I resolved this by making it cross over at the back, instead of being a halter. The ties were more than long enough to cross over and join at the point where the apron stuck out at the sides. I think it ended up looking even better as a crossover.

I'm still finishing off the last bits of the apron - neatening seams, making sure there aren't any stray bits of fabric or thread hanging out etc. - so I'll give you an update once I'm totally happy with it. I'm very happy with how it's turned out in the end though, but I'm a bit over working on it right now. Every time I look at it, I just keep thinking of all of those seams I had to rip and re-sew! This apron and I need a breather, some time apart, so we can be friends again.

Monday 7 July 2008

A fabulous outing

This morning Kat picked me up and took me too a mystery shopping destination. We parked and at Wattletree Rd and Burke Rd, and there on the corner, right opposite Central Park, was a shop with large windows, and I could see very clearly lots of colours. I could quite clearly see two rooms filled with patchwork fabrics! She had brought me to Patchwork on Central Park. I could hardly contain myself. Where to start?!


There were cute Japanese prints, retro kids prints, floral designs, animal prints, more traditional oriental prints, bold colours, pastels, folk prints, prints by Hollabee, Lara Cameron, Lotta Jansdotter and Auntie Cookie... oh my! Oh, and then there are the ribbons and trims that I wont even start on. I was in bliss.


After a coffee and raisin toast we made a trip to Fitzroy, where we headed to Clear It at 188 Brunswick Street. Normally I pick up a few things like hoodies or skirts from their downstairs section, where they sell leftovers and seconds from labels like Revival, Dangerfield and Alannah Hill. But today Kat and I headed straight to the 2nd floor, which is where the Alannah Hill fabrics are stocked: ends of the roll, seconds, faulty fabrics, buttons, notions etc. There are some truly beautiful fabrics, and some of the stretch ones definitely inspire me to learn how to use my overlocker. We bought some cotton fabric and a selection of light weight corduroys.

Sunday 6 July 2008

Birthday celebrations and 100th post all at once!

Wow, this is more good luck than better management, but not only is it my birthday today but also my 100th post!

I was a very lucky birthday girl indeed. I spent the day with my family and Gib and we had a trip out to a couple of craft markets in the morning before heading out to Kuranga Native Plant Nursery and their beautiful cafe in the afternoon. We picked up a few Conostylus, which are related to kangaroo paws (you can see that the flowers are quite similar). I was quite taken with the conostylus because the leaves are so soft and fluffy, but the yellow flowers are very similar to the kangaroo paws which I love. Apparently they grow well in well drained, sandy environments, and are well suited to pots. I have a couple of spare pots sitting around that are glazed in a blue/green colour - just the thing! In the tube there, I'm also holding a wattle of some sort (can't remember what it is... but it's very prickly!)

Oh yes, 'twas a bit chilly in the Dandenong Ranges! Thick jackets required!

I don't think I have ever mentioned how much I love watching The Cook and the Chef - I love how passionate Maggie and Simon are and how they show cooking how it really is. They make mistakes, they overcook things sometimes, they forget ingredients... but they roll with it and it's so obvious how much fun they have just being in the kitchen and enjoying food and the entire cooking process. And now, thanks to my brilliant family, I am the very happy owner of Maggie Beer's book, Maggie's Harvest. It's a beautiful book, I can't wait to try it out. Gib's family also gave me another cookbook called the Low GI Vegetarian Cookbook (how appropriate for this month!). They had it on loan from a friend when Gib's dad was first diagnosed with diabetes, and I adored every recipe. I think I'll be a busy girl in the kitchen!


Every Thursday night after training, Gib and I will come home and watch Iron Chef America. We started to notice that mandolins frequently showed up whenever the iron chefs needed to slice and dice up vegetables in a jiffy (which is all the time, in Iron Chef) and we both thought that if we're going to own any kitchen gadget, it must be a mandolin. I spend so much time slicing vegetables and mandolins make it look so easy! So Gib bought me a mandolin! I can't wait to give it a real try out! I'm a bit scared though. That slicer is sharp.

Maybe I'll be the next Iron Chef and be all pro with my mandolin...!

So all in all, an excellent birthday of hanging out with my boy, my family, looking at crafty stuff, looking at gardening stuff and consuming delicious food and wine. Couldn't have been better. It's been a big day though and I really need to snooze now...

Thursday 3 July 2008

Recipe Box Swap: BBQ chocolate filled bananas

The theme for this month's Recipe Box Swap at I have to say... is BBQ mains or sides. When I think of barbecues, I think of the standard sausages, corn, mushrooms... and then there's BBQ desserts. My all time favourite is the good old chocolate filled banana. It was a treat I'd have with the family of one of my best primary school friends on balmy summer evenings. It's so simple and deliciously messy (and low GI!).

You will need:
  • Ripe bananas - one per person, and maybe some spare too. They are popular!
  • Chocolate - about 4 squares per banana. Alternatively, you could use chopped mars bar!
  • A sharp knife
  • Aluminium foil
  1. Make a slit along the length of each banana
  2. Push the chocolate into the banana, right down into the flesh. Push the banana together to close it up again.
  3. Wrap in aluminium foil.
  4. Cook for approximately 15 mins on a slow-moderate part of your BBQ, turning once (after the mains are out and the BBQ is cooling down, I put my bananas on).
To eat: unwrap the banana and scoop out the banana flesh and chocolate with a spoon. You could also serve with ice cream, or maybe sprinkle with cinnamon. Be sure not to wear white clothing while eating these!

Image by exactfare instead of me, because it's not BBQ time in southern Australia at the moment :-(

My favourite sewing tutorials all in the one spot

Ack! I have several links to tutorials of things I want to make (or have made and want to remember where I found them), but I just can't keep up. So I'm dumping them here in a central location.
  • Craftzine: The ultimate idea and tutorial site!
  • Craft apron: I made a couple of these for cousins of mine at Christmas. A fantastic tutorial. I want to make one for myself.
  • Tissue box cover: This looks so easy. Why haven't I made myself one sooner? My office would be so much cooler with one of these.
  • Tutorials for what to do with old pillowcases.
  • Vegbee does some awesome tutes. I really want to make this scoodie!
  • Or maybe try out this scoodie... (instructions down the bottom of the page)
  • Baby softshoes
  • ... and bibs.
  • One Red Robin's pencil and notebook holder: Great idea! She makes such lovely things!
  • A zippered wristlet. For when I go down to the pub, dont' want to carry a whole bag, but don't want to lose my wallet either.
  • A simple sling bag that looks very pretty.
  • A snack bag. Such a great idea and so quick and simple! I love my snacks but hate using those ziplock bags all of the time.

Wednesday 2 July 2008

Crafty ways with legumes

I never grew up with legumes. My parents hate them. The thought of lentils makes my mother shudder. For me, I love legumes. I've been known to eat 4 bean mix straight out of the can. And in fact, right now as I'm typing this, I'm eating a wrap filled with kidney beans (and other things).

Jen from August Street isn't so excited about legumes, but has decided to give them a go as apart of the Low GI in July thing she's got going. I'd suggest, if you're just starting out on the legume adventure, to go with canned beans so you know what the texture of your legumes should be like, and then soak your own (they do taste so much better). I still used tinned beans from time to time but I find because I'm eating legumes regularly, I always have some sort of bean on to soak. And as long as you change the water they can soak for a few days. I should also mention that the whole unpleasant flatulence thing that everyone always talks about... it goes away after about a week of eating them regularly (regularly meaning maybe 4 times in a week?).

I'll now share my Top 10 favourite legume recipes (in no particular order):
  1. Chickpea and almond couscous: This is my all time favourite chickpea recipe. I could eat this all day. It's so good that it'd become a Christmas favourite with the whole of my dad's family and there's a lot of them!)
  2. Butter bean curry: I add broccoli and whatever is left in the fridge to this one as well. This is absolutely delicious
  3. Lentil and halloumi salad: Oh, this is delicious. I hate salads, but this one is an absolute favourite. I think it's the halloumi that makes it. Make sure you wash and drain your lentils well.
  4. Lentil shepherd's pie: I make this one for my family who were never brought up with meatless dishes and don't know how to take legumes being a "feature" of a meal. I have made this one low GI by replacing the potato mash with cauliflower mash (I head of cauliflower steamed and mashed with 2 tbsp thickened cream or sour cream).
  5. Mediterranean vegetable bake: So quick and easy to make. I'd never have thought to use weetbix in cooking, but damn, it goes good. Who'd have thought?
  6. Lentil lasagne: You can't go wrong with this.
  7. Chickpea and sweet potato koftas: I have made these for dinner parties before.
  8. Aromatic black eye bean curry: I recently tried this one out. Very flavourful! YUM!
  9. Bulghur and Chickpeas with Caramelized Onions and Mushrooms: I don't know where to get roasted buckwheat groats, so I replace them with bulghur (cracked wheat) instead. You can buy it from Coles and Safeway.
  10. Hommus: a quick and easy dip that is terrific when that mid-afternoon hunger pang hits.
My favourite websites for legume recipes are:
Photo by this is emily

Tuesday 1 July 2008

Music meme

I was tagged by Fibo for this music meme and it sure sounded like fun. I'm noticing that my current songs of choice are scattered over the past few decades (1979 - 2008), but they all have a similar sounds or themes. I wonder what that means...

Instructions, should you wish to participate:

"List seven songs you are into right now. No matter what the genre, whether they have words, or even if they're not any good, but they must be songs you're really enjoying now, shaping your summer/winter. Post these instructions in your blog along with your 7 songs. Then tag 7 other people to see what they're listening to." I wont pass the tag on, mostly because I'm not sure who to tag! But if you'd like to join in, feel free and let me know!

Queen: Don't stop me now
Múm: Green Grass Of Tunnel
Massive Attack: What your soul sings
Tori Amos: Strange little girl
Cornelius: Smoke
Daft Punk: Digital Love
Lamb: Sweet